Laser Cutting Design Guidelines
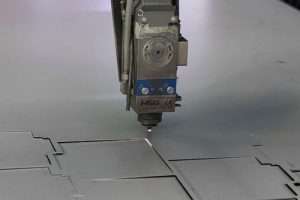
We provide a professional laser-cutting service for you based on the design you send to us. Considering some of our design guidelines while sending the 3D files will help us create quality Parts within the tolerance limit.
1. Format of the file
Ensure that you are sending the file in the format that we accept,
• .DFX ( AutoCAD, Fusion360 & Solid works )
• .eps (CorelDraw, Ink-scape)
• .DWG ( CAD)
• .ai ( adobe illustrator)
If you have the non-CAD file format (.ai), don’t worry. Send your file. We will take care of the conversion from our side.
2. Scaling
Another crucial element for precise laser cutting is drawing scaling. Make sure your scaling is set to 1:1. For instance, if a portion is supposed to be 10 inches square, design it as such to prevent confusion of scale or proportions. Additionally, it is better to dimension with inches or mm.
3. Min. Hole diameter
While creating the holes on the drawing, consider the minimum hole diameter as half of the sheet thickness. A Hole with a diameter less than that would not be created accurately with laser cutting. For example, if your sheet thickness is 0.20 inches, the diameter of any hole cannot be less than 0.10 inches.
Consider some millimeters of the distance between two laser-cutting positions because the laser might melt the nearby material, affect the dimensional stability, and break the material.
4. Exclude the text boxes (anchor points and curves)
Do not include any text boxes in your drawing because the laser-cutter can-not decode the letter text. If you need to have texts, convert them into vector values as anchor points and curves. CAD software allows converting by converting to outlines, exploding, or expanding options. You can check which option your design software has to convert your text into the vectorized form.
5. Remove overlapping lines
If you have a complex design, don’t worry; we can produce complex shapes with laser-cutting, although you need to remove overlapping lines from the design. Overlapping lines cause the cutting of unwanted positions.
6. Consider the kerf
The laser beam removes the small portion of the material in the cutting position while splitting the parts, known as kerf. So, consider the kerf in the design (Same as the width of the laser beam) to maintain dimensional stability while assembling or fitting multiple parts. So, while dimensioning your design, add half of the kerf to the inner object and half of the kerf from the outer part to account for the kerf dimension in your design.
7. Simplify the design as possible
The complexity of the design takes more time to cut and more parts for the end product, so, If possible, try to simplify your design without affecting the functionality of parts, which will save cost and time.
Checklist
- The format of the file is according to the format we accept
- There is no text in your design. If any, they are in vector values as anchor points and curves.
- No intersecting or over-lapping lines in the design
- Designed are scaled as 1:1
- There are no void objects or open contours in the file.
0 Comments