Notches are the inward cut from the edge of sheet metal with a measured angle suitable for a particular application. Notching is done either with a simple cutting or punching process. Tabs are small amounts of metal that connect pieces to parent sheet metal and make handling and inventorying easier. It allows the parts to remain bonded to the sheet metal, preventing them from breaking or suffering other physical harm.
Sheet metal fabrication uses notches and tabs to make further machining operations easier and eliminate space conflicts during assembly.
This article will go through several types of notches, dimensioning & tolerancing principles, the necessity of notches and tabs, disadvantages, and applications.
The Notching Process
As previously mentioned, notching is one of the essential operations in precise sheet metal fabrication. It plays a significant role in manipulating metal sheets into the required shape and size. It is typically done by removing material from designated areas with a punching press.
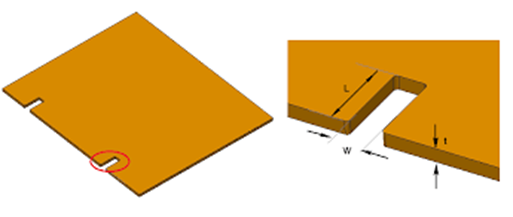
Notches
Notching begins with placing a metal sheet in a steady position, followed by removing unwanted material from the outer edge of the sheet. The operator set the speed of the punching press and fed the sheet into the machine.
Types of Notches
There are several types of notching, depending on what needs to be accomplished with further operations.
| Types | Description |
| Straight Notch | A straight cut from the edge to the bending position creates a fold-flap in the sheet. |
| Square notch | It involves removable material from corners. It eliminates the risk of overlapping while creating a rectangular or square box during the joining process. |
| Slant notch | Cutting of sheet metal from the corner at 45 degrees so that the sides will meet at the right angle during the bending operation. |
| V-notch | As the name suggests, it involves a V-shape cut from the edge of the sheet. It operates a perpendicular (90-degree) bend with an inside flange. |
| Wire notch | It prevents the overlapping of edges at the seam. It is done with the worksheet containing wired edges. |
Notch parameters
The most significant parameters for notching are width, length/depth, and corner radius. All of these are determined by the thickness of the sheet metal. Additionally, there is a restriction on the sheet metal thickness for notching, which must be at least 0.04″ thick (1mm) (A Definite Guide to Design for manufacturing success, 2015).
| Parameters | Limit |
| Notch width | Small than 1.5 x thickness(t) |
| Notch length/depth: | Up to 5 x thickness(t) |
| Corner radius: | Should be 0.5 x thickness(t) |
For example, in a sheet metal fabrication project with a thickness of 10mm, the notch width should be less than 15mm, the length/depth should be less than 50mm, and the corner radius should be 5 mm.
- Notch to bending position
It is critical to consider the location of the notches as well as the bending position while dimensioning the notches. Insufficient spacing between them may cause the sheet metal to distort at the bending location. The gap must be maintained at three times the thickness plus the inside bend radius to avoid possible failure.
The minimum distance between the notch and bending position = 3 x thickness (t) + inside bend radius (ri)
- Distance between two notches
Maintaining the proper distance between two notches prevents sheet cracking in the gap area. The distance between notches might vary depending on the application. However, it is advised that the distance between the two notches be at least twice the thickness of the sheet metal.
The minimum distance between two notches = 2 x thickness (t)
- Distance between a notch and hole
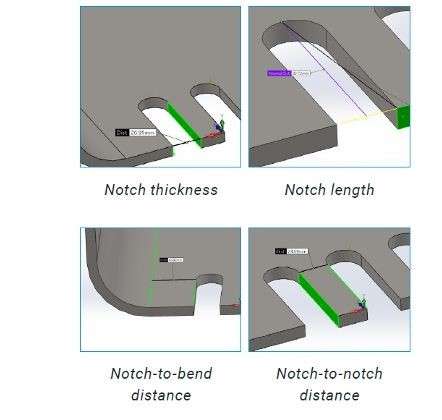
Various notch parameters
When the holes are close to the notching position, you must consider the suitable space between them. Otherwise, the hole may become deformed, or the material in the gap may shatter due to the high pressure used during the notching process. In conclusion, the minimum distance between a hole and a notch should be 1.2 times the material thickness.
Minimum distance between notch and hole = 1.2 x thickness (t)
Tabs
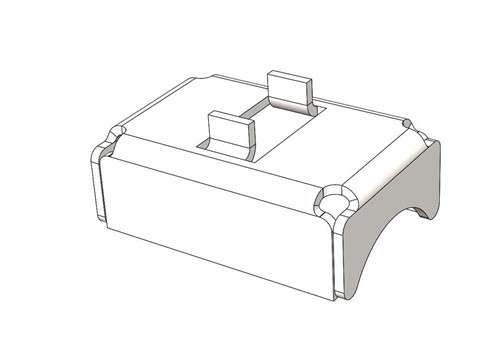
Tab feature
One of the critical purposes of creating tabs is to keep the part attached to the sheet so it will not break once it’s removed from the machine. Tabs are also used in secondary manufacturing operations.
Tabs parameters
As with the notches, width, and depth are two critical parameters required to be specified in the Design based on the thickness of the sheet. It is recommended that the width not be less than two times the thickness and the depth not less than five times the tap width (Mohammad Ali Farsi, 2009).
Tab width (w) = >2 x thickness (t)
Tab depth = ≤ 5 x width (w)
Distance between two tabs
There is a simple rule for a minimum distance between two tabs: keep a minimum gap of two times the sheet thickness between the tabs. Otherwise, the part will lose strength and may exhibit undesirable deformation.
The minimum distance between tabs= 2 X sheet thickness (t)
Importance of Notches & Tabs
Notches and tabs are crucial features that make assembly easier. For example, a tab can slide to notches to facilitate exact positioning before the joining operation.
- Notches are minor cuts in a part’s edge, whereas tabs are extending characteristics. Notches and tabs can also be used to add fasteners for fitting together several pieces. Furthermore, during assembly, a tab from one part can be inserted into a notch from another part.
- By aligning with slots, tabs can help to create robust welding during enclosure assembly.
- Notches and tabs are the best options to create the precise mate during assembly.
- These can help in precise joining processes such as riveting & welding.
- Manufacturers can generate intricate geometries using notches and tabs. The appropriate die-set shape for notching can be designed based on the specifications of the specific application.
- Notching applies to many material options, such as steel, aluminum, titanium, etc.
Disadvantage
- The initial cost of notching set-up is the prime disadvantage. It requires the punching press and dies according to the notches’ specifications. As a result, small and start-up businesses may find it costly to set up the punching machinery.
- Creation of the notches and tabs feature necessities for the skilled operator and Design considering all parameters such as minimum distance between notches, hole-to-notch distance, length, width, and many more.
Applications
One of the important applications of notching is to provide robust welding. When joining sheet metal parts of similar material, a cut in the joining point allows for a perpendicular connection, resulting in a powerful attachment by welding together as much as feasible.
Tabs & Notches also play a big role in the riveting operation. The tabs of one part can be designed to fit in the notch of another part, which eases the riveting. Tabs formed by notching and bending processes serve as contact points, making assembly easier, and the contact point can be linked using spot welding or riveting.
Another application of tabs & notching involves the heating and cooling areas. The perpendicular angle cuts create several rectangular and square boxes necessary for thermal applications.
Summary of Design Dimensioning & Tolerances
| Parameters | Description |
| Notch width | < 1.5 x t |
| Notch length/depth: | < 5 x t |
| Corner radius (notch): | 0.5 x t |
| A minimum distance of notch to bending position | 3 x t + inside bend radius (ri). |
| Distance between two notches | 2 x t |
| Distance between notches and hole | 1.2 x t |
| Tab width (w) | >2 x t |
| Tab depth | ≤ 5 x w |
| Distance between two tabs | 2 X t |
Conclusion
Notching involves the creation of small cuts in the sheet metal edges with blades of specific shapes or punching presses. While designing the tabs and notches in your sheet metal fabrication, it is recommended to double-check the specification and several dimensioning and tolerancing parameters. An appropriate design consideration might result in the deformation of the sheet and failure in the result. The small design consideration for creating tabs and notches can make your production process easier and more cost-effective.
Notches and tabs are essential elements for producing ideal edges for stamping, bending, and other fabrication processes. Prolean provides notching services in addition to other sheet metal operations. We offer different gauge notching over 20 different materials, feel free to contact us for any further needs.
FAQ’s
What are the notches and tabs?
Notches are the inward cut from the edge of sheet metal with a measured angle suitable for a particular application. In contrast, tabs refer to the small amounts of metal that connect pieces to the parent sheet.
What are the most crucial parameters to consider when designing notches and tabs?
There are several characteristics to consider, including length, width, depth, the minimum distance between hole and notch, the minimum separation between notches & tabs, the distance between notch and bending position, and many more. In this article, we discussed all of the parameters.
Why are tabs and notches essential in the sheet metal fabrication process?
Tab and notch features are beneficial in manipulating sheet meals in desired shape and size. It makes assembly, handling, and inventorying easier.
What are the applications of notches and tabs?
Notches and tabs play a significant role in the joining process by helping the creation of strong welding & riveting. These are applicable in enclosure fabrication, heating & cooling, and many more applications.
Bibliography
- A Definite Guide to Design for manufacturing success. (2015). DFMpro Geometric Limited.
- Mohammad Ali Farsi, B. A. (2009). FEATURE RECOGNITION AND DESIGN ADVISORY SYSTEM FOR SHEET METAL COMPONENTS. ResearchGate.

Our company produce industrial heating equipment’s and we outsource various parts of it involving notches and tabs! We have faced several problem on thermal efficiency of overall equipment’s because of notches & tabs accuracy! Any specific suggestion on this.
It should be because of surface finish quality
Does this relation” The minimum distance between the notch and bending position = 3 x thickness (t) + inside bend radius (ri)” work in all conditions?
yes ! it is the governing formula and covers all scenario.
Unglaublicher Artikel zu den Laschen und Kerben! Ich habe viel gelernt. Es könnte überzeugender sein, wenn man die verschiedenen Aspekte der Montage von Kerben und Laschen mit einbezieht.
Danke schön! Auch unsere weiteren Artikel werden diese Bereiche abdecken. Schauen Sie sich bitte weiterhin unseren regelmäßigen Blog-Beitrag an.
Comprehensive insights on tabs and notches. Could you directly specify the considerations during choosing right notch?
Thank you for your comment! the three main considerations are
1. Size Appropriateness: Choose a notch size that matches the scale of your project.
2. Material Compatibility: Ensure the notch material works well with the material of your object.
3. Functional Needs: Select a notch type that meets the specific requirements of your task.