“Tools are paramount in CNC milling as they make a significant difference in precision and overall quality. Enter the world of fly cutters, an indispensable tool in the CNC machinist’s arsenal. “
Fly cutters are unsung heroes in CNC milling, though not always in the limelight. They are known for their precision and unique finish. The fly cutters are the epitome of specialized machining. Their design, embedded in simplicity yet rooted in functionality, makes them indispensable for specific milling tasks. This article will discuss the Dynamics of Fly Cutters, including their design, operation, and undeniable significance in CNC milling.
Decoding the Fly Cutter Tool
In the world of machining, fly cutters have, over time, garnered admiration from experts for reasons beyond their simplistic design. They offer an intricacy that goes beyond their surface, making them valuable assets in milling.
The fly cutter’s origin is intertwined with the evolution of milling. Born out of necessity, it provided machinists a solution for achieving superior finishes, especially when working with flat surfaces. With its single-point cutting edge, the tool was able to deliver results that multi-point tools couldn’t replicate in terms of precision and smoothness.
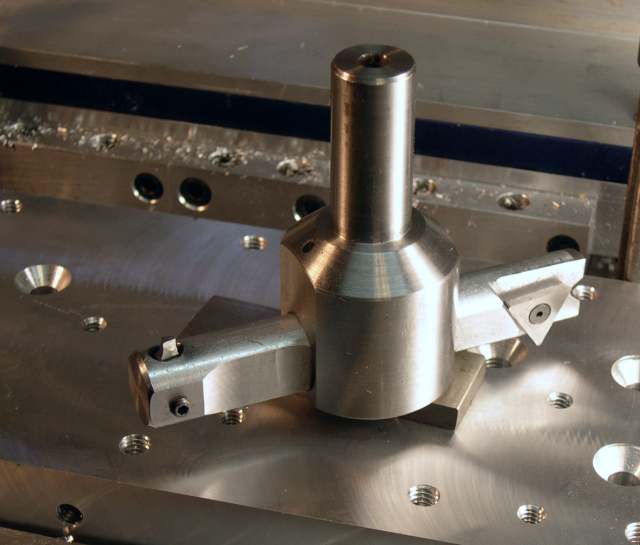
The Anatomy of a Fly Cutter
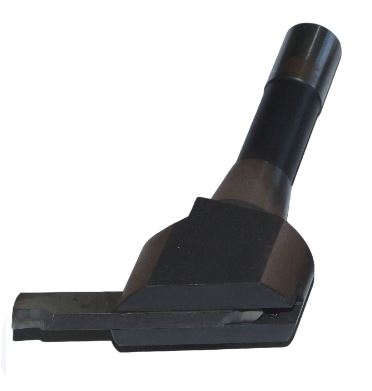
A typical example of a fly cutter tool
Diving into the heart of the fly cutter, one finds a world of engineering elegance, an interplay of design elements working in concert to deliver the tool’s signature performance. The fly cutter may appear simple at a glance, but each of its components is thoughtfully designed and plays a pivotal role in the tool’s overall functioning.
1. The Body
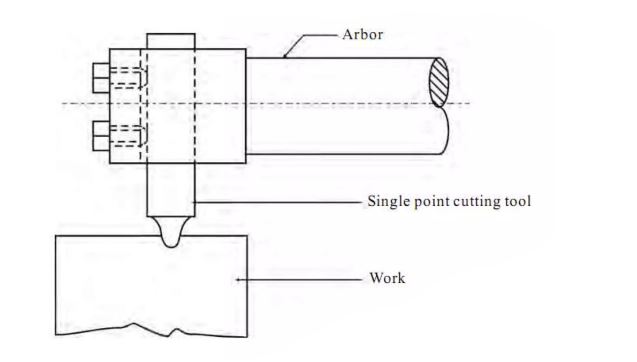
The body, often referred to as the tool holder or arbor, is the primary structure of the fly cutter. Typically cylindrical, it’s meticulously crafted to ensure maximum rigidity and stability during operations. The rigidity is important to maintain consistent finishes on the workpiece. The fly cutter is attached to the milling machine’s spindle through its shank. A precisely constructed body keeps the fly cutter centered and balanced, allowing for smooth rotations.
2. Tool Bit or Cutting Edge
Arguably the most vital component, the tool bit is the fly cutter’s business end. It’s here that the actual cutting action occurs. The tool bit is singular, distinguishing the fly cutter from other milling tools with multiple cutting edges. The single cutting edge is strategically positioned to slightly extend outward from the tool body. The tool bit is made of durable materials like high-speed steel or carbide and has a specific geometry. This geometry, which includes rake and relief angles, is designed to optimize cutting efficiency, heat dissipation, and chip evacuation.
3. Set Screw
Holding the tool bit firmly in place is the set screw, a small yet essential component. By ensuring that the tool bit remains stationary during operations, the set screw prevents unwanted movements that could compromise the finish or even damage the workpiece.
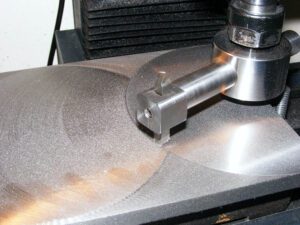
Working Principle of a Fly Cutter
Working of fly cutters
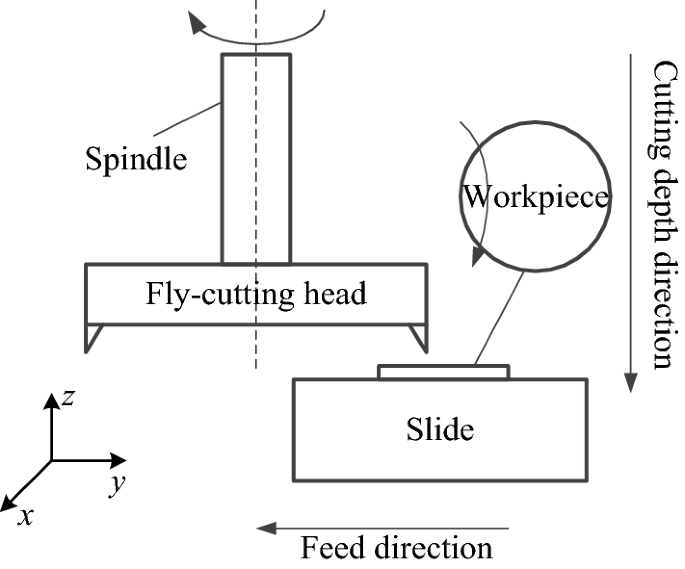
The fly cutter operates on a relatively direct mechanism, revolving over the workpiece when affixed to a machine’s spindle. This circulation, combined with the tool bit’s extension, provides the cutter its distinctive finishing capabilities. Though the concept appears elementary, it’s precisely this simplicity that is key to the tool’s efficiency.
The following are the key features of a fly cutter’s operation;
- Mounting and Stability: The fly cutter is attached securely to the machine’s spindle, ensuring its stability during operation.
- Singular Tool Bit Movement: Unlike multi-edged tools, the fly cutter relies on a single tool bit, extending outward to sweep across the material.
- Broad Sweeps: The wide radius of movement allows the tool bit to make extensive passes over the workpiece.
- Unmatched Finish: The combination of the tool bit’s design and its broad sweeping motion ensures a smooth and superior finish on the material.
- Simplicity is Key: The fly cutter’s uncomplicated movement is what grants it consistency and precision in its operation.
The Fly Cutter Tool Specification
The fly cutter, recognized for its simplicity and precision, becomes even more remarkable when one examines its technical specifications. A tool that’s been the mainstay of milling for years, its specifications directly influence its efficiency and the quality of the finish it can deliver.
1. Size Specification of a Fly Cutter
At the heart of the fly cutter’s design is its size, which governs the sweep and, by extension, the finish on the workpiece. Typically, fly cutters are designed to accommodate different tool bit sizes, giving them the versatility to adapt to varied machining tasks. Larger fly cutters, as expected, provide broader sweeps across the material. They are generally chosen for tasks where large surfaces need to be finished. On the other hand, smaller cutters are selected for finer, more detailed tasks.
2. The RPM Specifications
The RPM (Revolutions Per Minute) at which a fly cutter operates plays a pivotal role in determining the type of finish achieved. A higher RPM ensures a smoother finish but requires the machine operator to be mindful of the heat generated, which could affect the workpiece and the tool bit. Conversely, a slower RPM might not offer as smooth a finish but can be safer for delicate operations.
Table: Common Fly Cutter Specifications
| Feature | Specification | Remarks |
|---|---|---|
| Diameter | Typically 1″ to 2.5″ | Varies based on the application |
| Tool Bit Size | Commonly ¼”, ⅜”, ½” | Select based on the required finish |
| RPM | 500 – 2500 RPM (Material dependent) | Higher RPM for smoother finishes |
| Material Compatibility | Metals, Plastics, Woods | Ensure suitable tool bit material choice |
| Sweep Diameter | Up to 6” | Influenced by fly cutter and tool bit size |
3. Fly Cutter Specifications in a CNC Setup
In a CNC (Computer Numerical Control) setup, the fly cutter’s specifications are critical. CNC machines, known for precision, require exact specs for optimal operation. The tool bit size, cutter diameter, and RPM are usually input into the CNC system, which then automates the milling process based on these parameters. Ensuring these specifications are accurate is crucial to achieving the desired finish and preventing potential damage to the machine or workpiece.
4. Ensuring Proper Maintenance
With any tool, ensuring that it’s maintained within its specified parameters guarantees longevity and consistent performance. Regular checks on the tool bit for wear, ensuring it operates within the specified RPM, and confirming that the sweep is consistent with its design parameters are all essential maintenance practices.
What are the Different Types of Fly Cutter Tools?
Fly cutters are known for their simplistic design and versatile applications. Their diversity plays a pivotal role in catering to the varied requirements of the CNC milling domain. These tools remain consistent despite design, size, and intended use differences.
Let’s discuss several distinct types of flycutters and the unique characteristics that make them suitable for particular tasks.
Standard Single-Point Fly Cutter
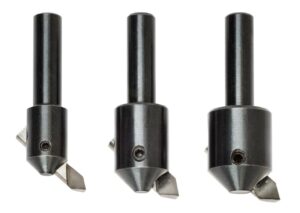
The standard single-point fly cutter is often considered the ‘original’ or ‘basic’ version within the CNC milling domain. Its popularity lies in its simplicity and efficiency. Here, a single tool bit does all the work. The sweep’s diameter, essentially the area the tool covers in one rotation, depends mainly on the tool bit’s length and the cutter’s overall size.
 .
.
Single-point fly cutters
Often, machinists lean towards the single-point fly cutter for its straightforward nature, especially when a simple, clean cut is all that’s needed. However, with this simplicity comes a limitation in adaptability. Once the tool bit is fixed, the cut’s depth and finish are pretty much set in stone.
Adjustable Fly Cutter
Transitioning from the standard type, the adjustable fly cutter offers a tantalizing option for those seeking flexibility in their milling operations. As its name implies, this cutter allows adjustments, specifically in the tool bit’s length. This freedom translates directly to control over the sweep’s diameter.
Adjustable fly cutter on action
This tool is indispensable for machinists who handle tasks that demand varied finishes or depths. For example, one might be working on a project requiring multiple surface textures. Instead of changing the entire setup, a simple adjustment to the tool bit gives the desired result. It’s this adaptability that has made the adjustable fly cutter a favorite among seasoned CNC operators.
Table: Adjustable Fly Cutter Advantages
| Feature | Benefit |
| Variable Tool Bit Length | Enables diverse finishes on a single workpiece. |
| Diameter Control | Allows for precise control over the depth of cuts. |
| Adaptability | Suitable for projects demanding varied surface textures |
Multi-Point Fly Cutter
While the single-point fly cutter reigns supreme in many workshops, there’s a growing interest in the multi-point variant. Armed with more than one tool bit, this tool brings a new dimension to CNC milling.
Multi-point fly cutter
Imagine a scenario where multiple cuts or finishes are essential, but time is of the essence. Instead of making several passes with a single-point cutter, the multi-point fly cutter accomplishes the task in one go. This ability to offer multiple finishes in a single pass sets it apart.
- Complexity: Distancing itself from traditional tools, it embraces multiple tool bits, thus broadening its utility.
- Advantages Over Single-Point: Ideal for situations demanding varied finishes or multiple depths within tight schedules. It reduces the need for multiple tool changes or numerous passes, saving time.
- Diverse Applications: It is especially beneficial when different surface textures on one workpiece are desired since these cutters provide varied finishes in a singular pass.
- Calibration: The inclusion of numerous tool bits demands precise setting and calibration. This accuracy is pivotal, especially when handling materials with diverse densities or intricate projects.
Indexable Fly Cutter
Last but by no means least, we have the indexable fly cutter. Its unique ability to rotate or ‘index’ the tool bit sets this type apart. At first glance, this might seem like a minor modification, but it’s a game-changer in practice.
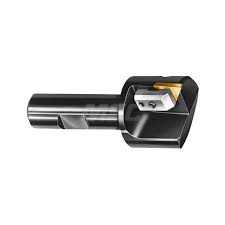
Indexable fly cutters
When milling materials are known to cause rapid wear, changing the tool bit frequently isn’t an optimal solution. Here, the indexable fly cutter shines. A fresh cutting edge is presented by simply rotating the tool bit, prolonging the tool’s lifespan. This not only saves on tool bit replacements but also reduces downtime.
Table: Indexable Fly Cutter Highlights
| Feature | Benefit |
| Rotatable Tool Bit | Offers fresh cutting edges without tool bit change. |
| Prolonged Lifespan | Reduced wear and tear due to varied tool bit usage. |
| Efficiency | Minimized downtime, maximizing productivity. |
How to Use a Fly Cutter in a Milling Machine?
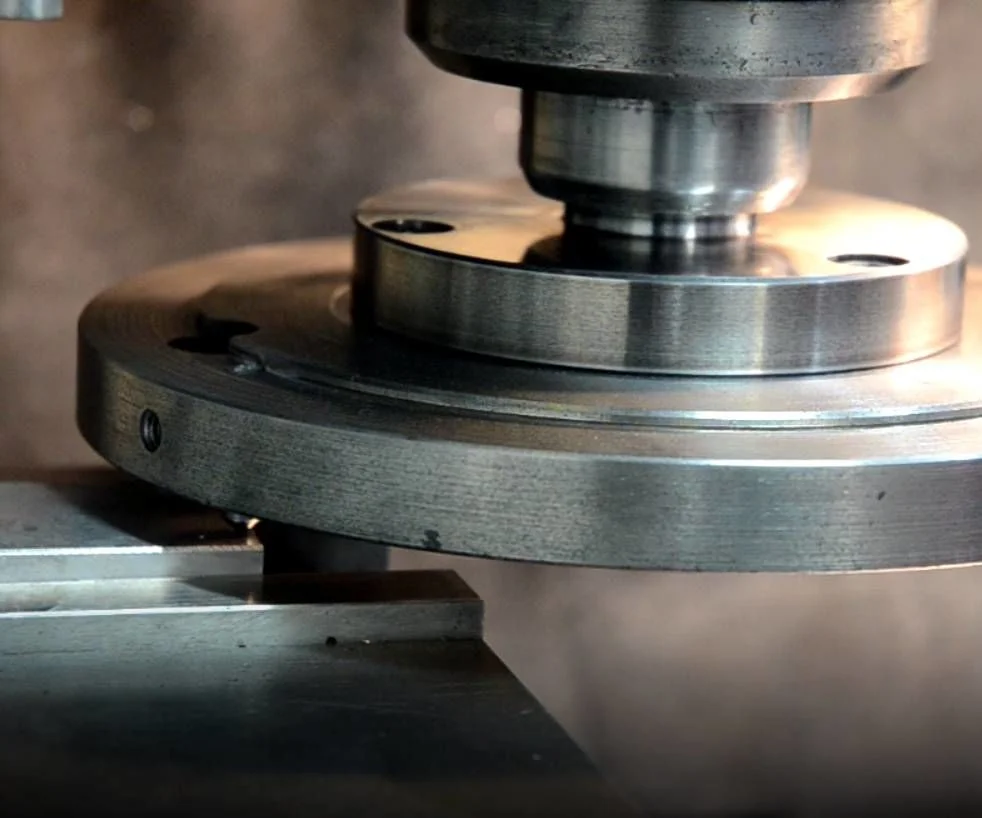
Fly cutter arrangement in a CNC milling machine.
Utilizing a fly cutter in a milling machine might seem daunting initially, but it becomes a straightforward task with proper guidance and precautions. Here’s a comprehensive guide on how to employ a fly cutter effectively in a milling machine:
- Choosing the Right Fly Cutter
- Material Suitability: Always select a fly cutter based on the material you’re working with. Different materials have varying hardness and require specialized tool bits.
- Surface Finish Requirements: Opt for a single-point fly cutter if your project demands a mirror-like finish. For diversified finishes, consider adjustable or multi-point variants.
- Installing the Fly Cutter
- Safety First: Ensure the milling machine is turned off and unplugged. This is a fundamental precaution that prevents accidental starts.
- Insert the Shank: Gently insert the shank of the fly cutter into the machine’s spindle or tool holder. Ensure it’s snug but not overtightened to avoid tool breakage.
- Secure the Tool Bit: Place the tool bit in the fly cutter’s slot, making sure it’s firmly held. The bit should protrude slightly, but not excessively, from the cutter’s edge.
- Setting the Correct Speed and Feed
Most fly cutters come with a manufacturer’s manual that provides recommended speed and feed settings. Adhering to these guidelines ensures optimal performance. Furthermore, harder materials usually require slower speeds, while softer materials can tolerate faster speeds. Adjust the feed rate accordingly.
Table: MaterialRecommended Speed (RPM)Feed Rate (mm/rev)
| Material | Recommended Speed (RPM) | Feed Rate (mm/rev) |
| Aluminum | 800-1200 | 0.1-0.3 |
| Steel | 400-800 | 0.05-0.15 |
| Brass | 600-1000 | 0.07-0.2 |
| Copper | 600-1000 | 0.07-0.2 |
| Stainless Steel | 200-600 | 0.03-0.1 |
| Titanium | 150-400 | 0.02-0.08 |
| Bronze | 500-900 | 0.06-0.18 |
| Cast Iron | 100-400 | 0.02-0.1 |
(Note: The values in the table are general guidelines. For best results, always refer to specific manufacturer recommendations based on the type of fly cutter and material in use)
- Positioning the Workpiece
Ensure your workpiece is securely clamped to the machine table. An unsteady piece can lead to uneven cuts or accidents. Then align the center, the tool bit should be aligned with the area you intend to cut. Use the machine’s X and Y axes for precise positioning.
- Initiate the Cutting Process
When beginning the cut, starting at a slower speed is advisable. This gives you better control and prevents mistakes. Don’t cut too deep too fast. Increase the depth gradually for a more uniform finish.
Observing the chips produced can give insights into the cutting process. Ideally, they should be consistent in size and shape. If they’re not, consider adjusting the speed or feed.
- Using Coolant or Lubrication
Lubrication can also improve the surface finish by reducing friction. Especially with metals, using a coolant prevents the tool bit from overheating, extending its lifespan.
- Regularly Check Tool Wear
After extended use, inspect the tool bit for signs of wear or damage. A worn-out bit can affect the quality of the cut. Run the sharpness test, and gently run your finger along the tool bit’s edge. If it feels blunt, consider sharpening or replacing it.
- Post-Operation Cleanup
- Remove Debris: Once you’ve completed the milling, clean the work area of any metal or wood chips.
- Inspect the Fly Cutter: Before storing, ensure the fly cutter is free from any debris or residues. This prolongs its operational life.
Click here to download How to use fly-cutters in CNC Milling
What Are the Benefits of Fly Cutters in CNC Milling?
Fly cutter tool
CNC milling, with its precision-driven approach and versatility, often relies on an arsenal of tools to deliver impeccable results. Among these, the fly cutter stands out not just for its distinctive design but also for the array of benefits it offers.
While it may appear rudimentary, a fly cutter’s impact in a CNC milling environment is profound. Let’s explore the manifold advantages of employing this stalwart tool in CNC operations.
- Superior Surface Finish
The topmost benefit that makes fly cutters the darling of many machinists is their unparalleled surface finish. Unlike end mills, which have multiple cutting edges that enter and exit the workpiece quickly, the fly cutter’s single-point design ensures a continuous, sweeping motion. This sweeping action minimizes the potential for tool marks or ridges, leading to a smoother finish.
- Cost-Effective Solution
In the realm of machining, cost efficiency plays a pivotal role. Fly cutters, with their simplistic design, offer a cost-effective alternative to more complex tooling solutions. Their single-point design means that only one tool bit undergoes wear and tear, making replacements both infrequent and affordable.
- Versatility in Cutting Diameter
Adjustable fly cutters are celebrated for their adaptability. By merely adjusting the tool bit’s length, machinists can modify the cutting diameter. This capability provides flexibility that’s hard to achieve with other tools, making it a boon for projects that demand varied cutting diameters.
- Reduced Heat Generation
With only one cutting edge in contact with the workpiece at any given moment, fly cutters generate less heat than multi-point tools. This reduced heat preserves the tool bit’s longevity and prevents potential thermal damage to the workpiece.
- Quick Set-Up Times
Setting up a fly cutter is relatively straightforward, especially on a CNC machine. The tool’s simplicity reduces calibration and setup times, ensuring that projects progress swiftly and without unnecessary hitches.
Try Prolean Now!
Size and RPM Specifications of Fly Cutter Tools
The benefits of a fly cutter are also inherently linked to its size and the RPM at which it operates. The correct combination of size and RPM ensures optimal performance, while deviations might lead to subpar results.
Table: Fly Cutter Type Vs. Size and RPM Specifications
| Fly Cutter Type | Typical Size Range | RPM Range |
| Standard Single-Point | 1″ to 2.5″ | 600 – 2500 RPM |
| Adjustable | 1.5″ to 3″ | 500 – 2400 RPM |
| Multi-Point | 1″ to 2.5″ | 550 – 2300 RPM |
| Indexable | 1.2″ to 3″ | 600 – 2450 RPM |
The correct combination of size and RPM ensures optimal performance. When the precision of CNC meets the finesse of a fly cutter, the results are often exemplary. On the other hand, deviations might lead to poor results on precision and as-machined finish.
Table: Optimal Size and RPM Ranges for Fly Cutters
| Fly Cutter Size | Recommended RPM |
| 1″ | 2400 – 2800 RPM |
| 1.5″ | 1600 – 2000 RPM |
| 2″ | 1200 – 1500 RPM |
| 2.5″ | 950 – 1150 RPM |
| 3″ | 800 – 1000 RPM |
Whether it’s the vast expanse of a workpiece that needs a uniform finish or a project demanding rapid turnarounds, the synergy of fly cutters and CNC milling machines addresses these issues.
How to Choose the Best Fly Cutter for My CNC Milling Project?
Choosing the right fly cutter for your CNC milling project is like selecting the perfect brush for a painting; both are instrumental in achieving the desired outcome. Fly cutters require careful selection based on the project at hand. Here, let’s walk through a step-by-step process to guide you in making an informed choice.
Step 1: Understand the Needs of the Milling Project
At first, it’s imperative to grasp the nuances of your project. Recognize the material you’ll be working with, metal, plastic, wood, or a composite. Furthermore, determine the intricacies of the design, like depth, surface finish, and detailing. The more you know about your project, the better equipped you’ll be to match it with an appropriate fly cutter.
Step 2: Factor in the Surface Finish
The finish of the milled surface often dictates the choice of the cutter. If your project requires a smooth, even finish, a standard single-point fly cutter might be ideal. Conversely, for intricate or varied finishes, an adjustable or multi-point fly cutter may be more fitting.
Step 3: Consider the Hardness of Material
Different materials pose unique challenges. Hard materials might warrant the use of indexable fly cutters, given their ability to rotate the tool bit and distribute wear. Soft materials, on the other hand, might work best with standard or adjustable fly cutters.
Step 4: Determine Depth and Detail Requirements
Some projects necessitate shallow cuts with meticulous detailing, while others might require deep & broad sweeps. If your project leans towards the former, consider an adjustable fly cutter for its precision. If it’s the latter, a standard fly cutter might suffice.
Step 5: Evaluate the Volume of Production
For one-off projects or prototyping, flexibility, and versatility are paramount. In such cases, adjustable fly cutters might be beneficial. However, for large-scale, repetitive tasks, indexable fly cutters can prove advantageous, minimizing the need for frequent tool changes.
Step 6: Gauge the Capabilities of the CNC Milling Machine
Not all CNC machines are built alike. Some have limitations concerning the type and size of the fly cutter they can accommodate. By understanding your machine’s specifications and constraints, you can narrow down the list of suitable fly cutters.
Step 7: Factor in Budget Constraints
While it’s tempting to opt for the most advanced fly cutter, budgetary considerations often play a role. By assessing the cost-benefit ratio of each type against your project’s requirements, you can strike a balance between performance and expenditure.
Step 8: Consult Experts or Manufacturers
Fly cutter manufacturers or seasoned machinists can provide invaluable insights. Their experience and expertise can guide you toward a choice that aligns with your project’s complications.
Step 9: Prioritize Safety and Usability
A fly cutter’s design should not only be functional but also safe. Look for features that minimize tool chatter or vibration. Additionally, easy usability, such as tool bit changes without complications, can enhance the machining experience.
Step 10: Stay Updated with Technological Advancements
The world of CNC milling is ever-evolving. Newer versions of fly cutters or innovative features can emerge. By staying attuned to technological advancements, you ensure that your choice remains relevant and efficient.
Fly Cutter vs. Face Mill in the Machining Arena
In the world of CNC machining, every tool has its unique role, advantages, and limitations. The choice between a fly cutter and a face mill is one that professionals often grapple with, as both tools offer unique benefits.
Face Mill: Contrasting starkly with the fly cutter, a face mill uses multiple cutting edges or inserts. These tools are designed for rapid material removal and can cover large surface areas in a short time. Their multi-point design allows for higher feed rates, making them suitable for bulk machining tasks.
Key Differences between Fly Cutters and Face Mills
Let’s discuss the key differences between these two machining tools based on different criteria, such as surface finish, cost, cutting edges, and more.
Table: The Key Differences between face mill & fly cutters
| Tool | Cutting Edges | Surface Finish | Material Removal Rate (MRR) | Versatility | Cost |
|---|---|---|---|---|---|
| Fly Cutter | Single cutting edge | Delivers an unparalleled smooth finish due to its continuous cutting motion | Lower MRR because of its single-point cutting design | More versatile in terms of adjusting the cutting diameter by merely changing the tool bit’s length | Generally more cost-effective due to its simple design and fewer parts |
| Face Mill | Multiple cutting edges or inserts | Provides a good finish but might leave multiple tool marks due to its several cutting edges | Higher MRR, suitable for bulk removal due to its multi-point cutting action | Less versatile in this aspect, with the diameter determined by the tool’s size | Can be more expensive, especially those with replaceable inserts |
Applications & Suitability Differences
Fly cutters often find their niche in tasks that demand impeccable surface finishes. They’re perfect for jobs where the quality of the finish is paramount over speed. Moreover, their simplicity makes them a cost-effective solution for smaller workshops or hobbyists.
Face mills, on the other hand, dominate scenarios that call for rapid material removal across large surfaces. Industries that require mass production or rapid prototyping often lean towards face mills due to their efficiency.
Operational Speed and Feed Rate Differences
The speed and feed rates for both tools differ significantly. Fly cutters generally operate at slower speeds, ensuring that the single cutting edge does not wear out quickly. Face mills can sustain higher speeds and feed rates, given their robust construction and multiple cutting edges.
Table: Typical Speed and Feed Rates
| Tool | Speed (RPM) | Feed Rate (IPM) |
|---|---|---|
| Fly Cutter | 800 – 2800 | 3 – 15 |
| Face Mill | 1000 – 4000 | 12 – 60 |
What Are the Applications of Fly Cutters?
Fly cutters’ adaptability and precision have made them outstanding for tasks that demand expansive and intricate milling.
“ Ultra-precision fly cutting (UPFC) applies an intermittent cutting process, where diamond tools rotate with a spindle to remove surface material. It is more flexible for freeform and micro/nano-structural surfaces, such as v-grooves and pyramids.” Source. As technological advancements propel CNC milling to new boundaries, the varied fly cutters have found their niche in diverse applications.
Table: Application of different Fly cutters
| Fly Cutter Type | Applications | Why? |
| Standard Single-Point Fly Cutter | Surface finishing, Flat milling, Broad sweeping operations, Basic metalwork, Woodwork surface finishes, Basic engraving, Edge chamfering, Mild contouring, Achieving smooth toolpaths, Basic slotting | Offers a simple, straightforward cutting process. It is ideal for tasks requiring clean and even finishes. Reduced vibrations ensure smoother outcomes. Minimal tool chatter potential. |
| Adjustable Fly Cutter | Varied depth cutting, Varied finish milling, Prototyping, Customized metalwork, Detailed woodwork, Specialized engraving, Precise slotting, Recessed detailing, Groove cutting, and Scallop machining | Provides flexibility in adjusting tool bit length. Allows machinists to control the diameter of the sweep. It can be tailored to achieve specific finishes or depths. Enhanced adaptability for custom jobs. |
| Multi-point fly Cutter | Multi-depth cutting, Diverse finish milling, Intricate metalwork, Complex wood patterns, High-detail engraving, Multi-slotting, Detailed recessing, Advanced contouring, Groove, and ridge cutting, Scallop & texture machining | Multiple tool bits facilitate varied finishes in one go. Reduces the need for several tool changes or passes. Ensures consistency across diverse depths and finishes—time-efficient for intricate tasks. |
| Indexable Fly Cutter | Materials causing rapid wear, Continuous metalwork, Repetitive woodwork patterns, Repeated engraving patterns, Continuous slotting, Ongoing contouring, Serial number engraving, Iterative detailing, and Prolonged groove cutting | Tool bit can be indexed or rotated for different cutting edges. Reduces wear by distributing it across multiple edges. Enhances the tool’s lifespan in wear-prone tasks. Minimizes downtime for tool bit changes. |
Prolean’s CNC Milling Services: Where Precision Meets Perfection
In CNC milling, where instruments such as fly cutters define excellence, our services stand out as the pinnacle of precision and creativity. We merge time-honored tools with modern methodologies, transforming the industry’s approach to milling.
Moreover, our unwavering dedication to being at the cutting edge of technology ensures that our clients consistently receive solutions that epitomize innovation and efficiency. Be it the understated sophistication of a fly cutter’s path or the intricate capabilities of advanced tools, our CNC milling services capture the essence of craftsmanship.
Incorporating tools like fly cutters into our operations underscores our commitment to unparalleled quality. For us, it’s more than just completing a task; it’s about executing it flawlessly, with pinpoint accuracy, utmost efficiency, and a dash of flair.
Summing up
The fly cutter tools are crucial in various CNC milling projects. These tools bring versatility, precision, and efficiency, whether designed for CNC machines or their adjustable counterparts. These tools offer flawless surface finish or the need to cover extensive workpiece areas efficiently. Their versatility, combined with cost-effectiveness, makes them indispensable across the industries.
As we discussed various aspects of fly cutters, the dynamics of fly cutters are indispensable in CNC milling. With their simple design, they bring perfection to milling operations.
Read more:
FAQs
What materials can be machined with a fly cutter?
Fly cutters are versatile and can be used on a variety of materials, including metals, plastics, and wood.
How does the finish from a fly cutter compare to other milling tools?
Fly cutters typically provide a smoother finish due to their single-point cutting action, minimizing tool marks.
Can fly cutters be used on any milling machine?
While most suited for CNC machines and manual mills, the specific compatibility depends on the machine’s spindle size and power.
Why choose a fly cutter over a face mill?
Fly cutters are generally more cost-effective, easier to set up, and can offer a superior surface finish. However, face mills might be faster for large jobs.
How do I determine the best RPM for a fly cutter?
Ideal RPM varies based on material, cutter size, and desired finish. It’s best to consult tooling guidelines or conduct test cuts.
Are there safety concerns associated with using fly cutters?
Like all milling tools, appropriate safety measures, including wearing protective gear and ensuring secure tool mounting, should be followed
How does an adjustable fly cutter differ?
It allows machinists to adjust the cutting diameter for versatile machining applications.
References

I think now i can visualize different types of fly cutters in my head! nicely written piece.
Great to know mave!
So professional illustration! Could you please specify when to use indexable fly cutters?