CNC machining tolerances refer to the acceptable range of dimensional and physical parameters, which can deviate from their pre-defined value. It primarily includes the physical dimensions such as height, width, thickness, depth, and angles but does not exclude the physical parameters like temperature, stress, and humidity.
Tolerance is the permissible error while machining the parts with CNC. We express the tolerances in the upper limit, which refers to how much positive deviation is allowable.
This article will cover typical machining tolerances, several tolerance types, influencing factors, tolerancing tips, and the relationship between tolerances and surface finishing.
Typical machining tolerances
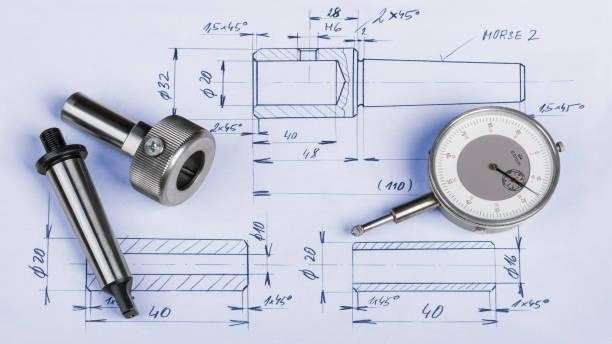
Technical specifications for machined components
Machining tolerances refer to the allowed deviation from a specified dimension in a machined part. Tolerances can be affected by several factors such as the type of machine, the type of cutting tool, the material being machined, and the complexity of the part.
Typical machining tolerances for common manufacturing processes are:
-
- Turning: ±0.005″ to ±0.015″
- Milling: ±0.005″ to ±0.015″
- Drilling: ±0.005″ to ±0.015″
- Grinding: ±0.001″ to ±0.005″
- Wire EDM: ±0.001″ to ±0.002″
These are general guidelines, and tolerances may vary depending on the specific requirements of the job and the manufacturing process used. Additional precision techniques such as superfinishing may be used for very tight tolerance applications to achieve tighter tolerances.
CNC Machining Tolerances
There are two contexts of tolerancing in CNC machining, One with the design and another with the machines.
Design tolerances: The permissible level of accuracy specified in the computer design.
Machine tolerances: Depending on the type of CNC machine, they also have their own restriction and range of achievable accuracy while machining. Generally, CNC machines are capable of maintaining a tolerance of ± 0.0025mm(Fan J, 2021)
Tolerancing is crucial when parts are assembled later to make a specific product. The use of the parts dictates how precise tolerances must be in CNC machining projects. Design engineers fixed the tolerances based on the required functions and parts fitting. For instance, kitchenware may not instruct the tight tolerances that defense or aircraft parts do.
Related:
Relation between Metrology and Manufacturing: Everything You Need to Know
Try Prolean Now!
Types of Tolerances
There are primarily four types of tolerances used in CNC machine parts. Let’s take a closer look at each of them.
1. Limit tolerances
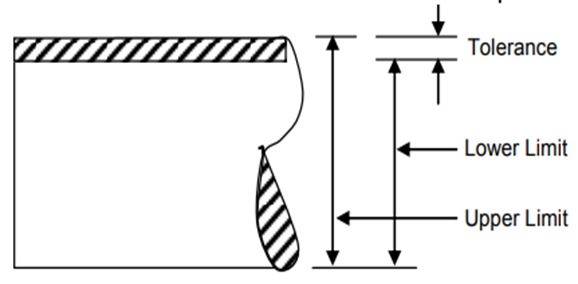
Example of limit tolerance
Limit tolerances are the range of two-dimensional values, where the measurement of CNC-machined parts must fall under that range. The higher number denotes the most allowable dimension, and the lower value indicates the lowest allowed dimension.
For Example, if a part has a limit tolerance (width) of 0.82-0.90 mm, the acceptable width is between 0.82 and 0.90 mm. That part is unacceptable if the width does not fall under the range during manufacturing.
2. Unilateral tolerances
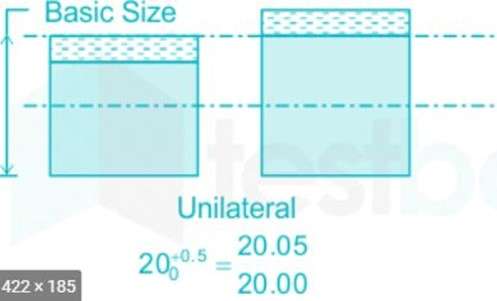
Example of unilateral tolerances
Unilateral tolerances dictate the range of allowable dimensions in one direction only, which can be either negative or positive. For Example, if a part has diameter tolerance in a hole 3 mm+ 0.007/ – 0.00, it represents that the diameter can go from 3 to 3.007 mm only.
It is used in components that require fittings later. For Example, in the manufacturing of shafts, unilateral tolerances are applied. Here If the shaft diameter is slightly more than the hole size, it will not fit, so only using negative tolerancing will save time and material wastage.
3. Bilateral tolerances
Unlike unilateral tolerances, bilateral tolerances allow error in both positive and negative sides with respect to base dimension by the same value. The base value may be slightly higher or lower than the value of the permitted measurement.
For Example, the bilateral tolerance of ± 0.005 mm dictates the manufacturer to create the part that can only be 0.005 mm shorter or longer than the stated value.
4. Standard tolerances
Standard tolerances are the most prevalent tolerances used in CNC machining and other metal fabrication methods.
It enables the product to function broadly. The standard tolerances may vary depending on the kind of requirements. The most commonly used standard is ISO 286-1:2010. However, the tolerances vary based on the grade of CNC machines. It is applicable for creating holes, threads, pipes, pins, and other features.

Standard tolerances
The standard tolerances are defined for angular & linear dimensions, rounded portions, chamfers, and others. There are four classes of standard tolerances fine, medium, coarse, and very coarse.
All tolerance ranges for each dimension are based on the standards of EN 20286, JIS B 0401, ISO 286, ISO 1829, ISO 2768, ANSI B4.1, and ANSI B4.2.
5. Geometric dimensioning & tolerancing (GD&T)
More than any other manufacturing method, CNC machining extensively uses GD&T. GD&T ensures further characteristics of the dimensions, such as positioning, flatness, roundness, and concentricity. It defines all the physical dimensions of the part going to CNC-machined.
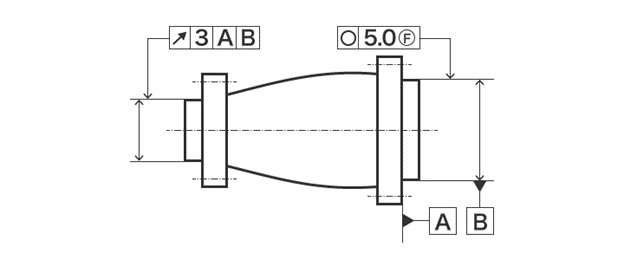
Example of GD&T
GD&T system contains various symbols that define the part’s geometric properties, such as datum line, modifier, and tolerances. It does not define the deviation from the base dimension but dictates the tolerances in specifications. Using GD&T enables CNC machining manufacturers to produce a variety of features within a specific accuracy range.
- True position: The true position of any feature is determined by the location of the datum line (reference line). For Example, a coordinate (X, Y) might describe the true position of a hole. A datum line is fixed at the start of the tolerancing process.
- Flatness: Tolerancing of flatness is defined by the two parallel planes within the milling surface. It is crucial during milling because the stress of clamping force might cause the warpage and affect the flatness.
- Cylindricity: The two concentric cylinders that the machined hole must lie inside are what characterize cylinders.
- Concentricity: The circular boss or coaxial counter-bore is ensured by concentricity. For instance, a car’s wheels are always concentric with the axle.
- Perpendicularity: Perpendicularity is measured by the deviation of the horizontal surface to the adjacent vertical surface within a CNC-machined part. Perpendicularity helps regulate Squareness as well.
There are additional criteria in addition to the ones mentioned above, such as angularity, straightness, parallelism, and others.
Factors to Consider while Choosing Tolerances
When selecting the tolerances for your CNC machining project, there are many things to consider. The precision and other requirements of the parts will determine the required tolerances.
Let’s go into more depth about a few key elements influencing the choice of tolerances.
1. Type of the material
The type of material selected for CNC machining affects the achievable tolerances. Different properties, such as hardness, density, abrasiveness, thermal stability, and Machinability, affect responsiveness when tools apply stress to the workpiece during machining. These material characteristics determine how difficult it is to machine and the range of tolerances that can be attained.
Learn more about the Machinability of Material and its Relation with CNC Machining
2. Required performance
Some components, such as fitting, aerospace, and defense, need to be exceedingly exact.
Therefore tolerances also depend on the requirement of the particular part. Some components, such as cookware, window frames, and door handles, might not require tight tolerances.
3. Cost
If you need tight tolerances, the advanced CNC machine, adjusted settings, and various tool setups will be required. So, more time will be consumed to create more accurate parts, resulting in the high cost of the final product.
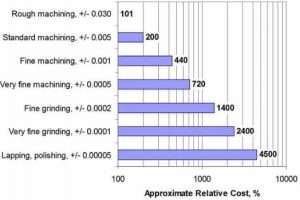
Cost increasing with tight tolerance
Typically, production costs increase when there is a tolerance of more than 0.1 mm. Therefore, tighter tolerance results in higher production costs.
4. Available resources for inspection
The selection of tolerances also depends on the available technology or resources for inspection. More advanced inspection equipment will be required to check the tight tolerances (slight deviation). While defining the tolerance, the inspection method should be considered to create the parts which fall within the pre-defined range.
Surface Finishing and Tolerances
High surface roughness impacts tolerances, which affects the intended precision. You need to fix the roughness before tolerancing the features in any parts. It is best to set at least 63 µ in roughness for flat or perpendicular surfaces and 125 µ in for curved ones.
Related:
- Surface Roughness: Everything You Need to Know
- CNC Precision Machining Explained: Benefits & Practical Uses
Tolerancing Tips for CNC Machining Parts
Tolerancing is the process of dimensioning the parts with permissible errors. Having ideas about design tips helps to minimize the error with tolerances. Let’s discuss some of the design tips.
- All the features present in your design might not need to be tolerancing. So, define which features are critical and need to be tolerancing. For Example, tolerancing for a mate or interference is more essential than any other features.
- Avoid maintaining tight tolerances in unneeded portions since it is not necessary to do so for all features. Unnecessary tolerancing raised the time and machining cost.
- While designing the parts, consider the tolerancing capacity of CNC machines. It might happen that sometimes you design the parts with tight tolerance, and that cannot be achieved with the available CNC machine.
- Consider the type of material you are going to the machine. The type of material also influences the range of acceptable tolerances. For Example, it is hard to maintain tight tolerances with soft materials.
How to achieve tighter CNC machining tolerances
- Use high-quality tools: Choosing the right tools for the job is crucial for achieving tight tolerances in CNC machining. High-quality tools with sharp edges and precise geometry will produce cleaner cuts and reduce the risk of tool deflection.
- Proper workholding: The way the workpiece is held during the machining process can have a big impact on the final tolerance. Make sure the workpiece is properly clamped or secured so it does not move during machining.
- Optimal cutting conditions: The right cutting conditions, such as speed and feed rate, can help reduce errors and achieve tighter tolerances. Work with your CNC machine operator to determine the best cutting conditions for each job.
- Use well-maintained equipment: Keeping your CNC machine in good condition is essential for achieving tight tolerances. Regular maintenance and calibration of the machine can help ensure that it performs at its best.
- Minimize tool deflection: Tool deflection can cause significant deviations in the final part, so it is important to minimize this as much as possible. This can be done by reducing cutting forces, using high-quality tools, or by adjusting the tool path.
- Temperature control: Keeping the workpiece and tool at a consistent temperature can help reduce errors and improve the accuracy of the final part. This can be achieved by using coolant, controlling the environment, or by reducing the machining time.
- Use simulation software: Simulation software can help predict the behavior of the cutting process, allowing you to make adjustments before actually machining the part. This can help identify any potential issues and improve the accuracy of the final part.
Learn more:
- How to avoid roughness on a CNC milling machine
- Micro CNC Machining: Process, Types, and Advantages
Conclusion
Tolerances are a crucial factor in all types of CNC machining. It defines the maximum permissible deviation in dimensions and other physical properties. The selection of tolerances in any machining project depends upon the capacity of machines, desired accuracy, and type of material.
A simple CNC machine can achieve the required tolerances in many cases, although tighter tolerances require more advanced machinery and tool configuration. At Prolean, we have cutting-edge multi-axis CNC equipment to deliver the high accuracy required for all tolerances. In addition, our experts from the quality control department closely monitor each step of the process and inspect the manufactured product. If you are going to send us the design, we highly recommend specifying all the tolerance. We will deliver the accurate parts to your door within a few days.
FAQ’s
What does it mean by tolerances?
The maximum permitted deviation from the base value of any dimension or physical property is referred to as tolerance. For instance, in width 6 ± 0.05 mm, the base value is 6 mm, while the tolerance is represented by 0.05 mm. It states that only values between 5.95 and 6.05 mm are permitted.
What are the common types of tolerances?
Manufacturing typically employs five different types of tolerances: limit, unilateral, bilateral, standard, and geometric dimensioning & tolerancing (GD&T). However, GD&T is the most commonly used for CNC machining projects.
What variables influence the choice of tolerances?
The choice of tolerances is influenced by various variables, including the type of raw material, end-use requirements, cost, and the availability of inspection resources.
Do all parts need tight tolerances?
All CNC-machined parts do not need to have exact tolerances. It depends upon the necessity and functionality of the specific component and features. For instance, a shaft requires exceptionally tight tolerances, yet a door handle does not.


I loved how you present all the tolerances offered by various CNC machining techniques.
Thank you for your kind words
How does the cost can be changed if i change the tolerance from +-0.009 to 0.006 while machining aluminum parts??
Reducing the tolerance from ±0.009 to ±0.006 in machining aluminum parts will likely increase the cost. Tighter tolerances require more precise machinery, potentially slower machining speeds, more frequent tool changes, and increased quality control measures, all of which contribute to higher production costs. The exact cost increase would depend on the specific machining processes and equipment used.
However, at Prolean ,our cost only might changed only from 5-15%.