
Knurling part design by using Solidworks
What is CNC Knurling? It is a manufacturing process wherein a pattern is rolled onto a workpiece’s surface to improve grip, appearance, or functionality. As a machinist or engineer, you may often encounter knurling in various applications, such as handles, knobs, and fasteners. This article will guide you through the essential steps and best practices to achieve impeccable knurling results in your projects, whether you’re a beginner or a seasoned professional.
In the following sections, you’ll learn about knurling calculations and formulas, the different types of knurling and their applications, best practices for accurate knurling specifications, common mistakes to avoid, and how to use Solidworks for knurling design and simulation. Additionally, we’ll provide a comprehensive knurling tutorial for beginners and advanced techniques for professionals. By the end of this article, you’ll be well on your way to mastering the art of knurling.
Understanding CNC knurling calculations and formulas
Before delving into the details of the knurling process, it’s crucial to understand the calculations and formulas involved. These calculations help determine the appropriate knurling specifications for your workpiece, ensuring a perfect fit and finish.
Pitch and diameter calculations
The pitch of a knurl is the distance between two adjacent teeth on the knurling tool. To calculate the pitch, divide the circumference of the workpiece by the number of teeth desired. The diameter of the workpiece must be an integral multiple of the pitch to ensure proper meshing of the knurling tool and workpiece. Use the following formula to determine the correct workpiece diameter:
D = (N * P) / π
Where D is the workpiece diameter, N is the number of teeth, and P is the pitch.
Depth of cut
The depth of cut refers to how deep the knurling tool penetrates the workpiece’s surface. It is essential for achieving the desired texture and appearance. To calculate the depth of the cut, use the following formula:
DOC = P * (tan α / 2)
Where DOC is the depth of cut, P is the pitch, and α is the included angle of the knurling tool’s teeth.
Try Prolean Now!
Types of knurling and their applications
There are various types of knurling, each type with its unique applications and benefits. Understanding the differences between them is essential for selecting the appropriate method for your project.
Straight knurling
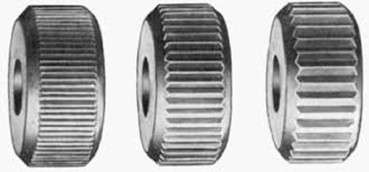
Straight knurling
Straight knurling is characterized by parallel lines running along the workpiece’s length. This type of knurling is commonly used for creating a non-slip grip on handles, levers, and knobs.
Diagonal knurling
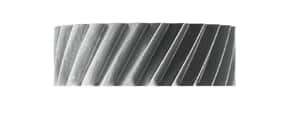
Right-hand diagonal knurl wheels
Diagonal knurling features a pattern of diagonal lines across the workpiece’s surface. This type of knurling is often used for decorative purposes and can also provide additional grip.
Diamond knurling
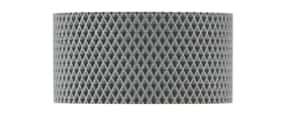
Female diamond knurl wheels
Diamond knurling consists of a crisscross pattern, creating a diamond-like texture on the workpiece. It is widely used for enhancing the grip on various components, such as thumb screws, nuts, and bolts.
Best practices for accurate knurling spec
To ensure the best possible knurling results, follow these best practices for accurate knurling specifications:
- Choose the right knurling tool: Select the appropriate knurling tool based on the desired pattern, pitch, and included angle. Ensure that the tool is sharp and free of defects.
- Align the tool and workpiece properly: Proper alignment of the knurling tool and workpiece is critical for achieving a consistent and clean pattern. Make sure the tool is perpendicular to the workpiece’s axis and centered on the desired knurling location.
- Use the correct feed rate: The feed rate during knurling affects the quality and appearance of the final pattern. A slower feed rate will result in a deeper, more defined pattern, while a faster feed rate will produce a shallower, less distinct pattern. Adjust the feed rate according to the desired depth of cut and material properties.
Essential steps for impeccable knurling results
To achieve impeccable knurling results, follow these essential steps:
- Select the appropriate knurling tool and workpiece: Based on your project requirements and desired pattern, choose the right knurling tool and workpiece material.
- Calculate the pitch, diameter, and depth of cut: Using the previously discussed formulas, determine the correct pitch, diameter, and depth of cut for your knurling project.
- Set up the machine: Properly set up and align your lathe or milling machine, ensuring that the lathe knurling tool is perpendicular to the workpiece’s axis and centered on the desired location.
- Apply cutting fluid: Apply a suitable cutting fluid to the workpiece and knurling tool to reduce friction, heat, and tool wear.
- Perform a trial run: Before knurling the actual workpiece, perform a trial run on a scrap piece to ensure proper tool alignment, feed rate, and depth of cut.
- Knurl the workpiece: With everything set up correctly, begin knurling the workpiece. Monitor the process closely and make any necessary adjustments for optimal results.
Common knurling mistakes to avoid
To minimize errors and produce high-quality knurling results, avoid these common mistakes:
- Using a dull or damaged tool: A dull or damaged knurling tool will not produce a clean, consistent pattern. Always inspect your tools before use and replace them if necessary.
- Poor tool alignment: Incorrect alignment of the knurling tool and workpiece can result in an uneven or incomplete pattern. Always double-check your alignment before starting the knurling process.
- Incorrect feed rate: Using the wrong feed rate can affect the quality and appearance of the final pattern. Adjust your feed rate according to the desired depth of cut and material properties.
- Insufficient cutting fluid: Neglecting to apply cutting fluid can cause excessive heat, friction, and tool wear. Always use a suitable cutting fluid during the knurling process.
Comprehensive knurling tutorial for beginners
For those new to knurling, the following tutorial provides a step-by-step guide to mastering the basics:
- Select the appropriate knurling tool: Choose a knurling tool based on the desired pattern, pitch, and included angle.
- Calculate the pitch, diameter, and depth of cut: Use the previously discussed formulas to determine the correct pitch, diameter, and depth of cut for your knurling project.
- Set up the machine: Properly set up and align your lathe or milling machine, ensuring that the knurling tool is perpendicular to the workpiece’s axis and centered on the desired location.
- Apply cutting fluid: Apply a suitable cutting fluid to the workpiece and knurling tool to reduce friction, heat, and tool wear.
- Perform a trial run: Before knurling the actual workpiece, perform a trial run on a scrap piece to ensure proper tool alignment, feed rate, and depth of cut.
- Knurl the workpiece: With everything set up correctly, begin knurling the workpiece. Monitor the process closely and make any necessary adjustments for optimal results.
Using Solidworks for knurling design and simulation
Solidworks is a powerful 3D modeling software that can be used to design and simulate knurling projects. With Solidworks, you can create accurate 3D models of your workpiece, apply various knurling patterns, and simulate the knurling process to ensure optimal results.
- Design your workpiece: Using Solidworks, create a 3D model of your workpiece, ensuring that the dimensions and material properties match your project requirements.
- Apply a knurling pattern: Select the desired knurling pattern from the Solidworks library or create your custom pattern. Apply the pattern to the workpiece model, adjusting the pitch, diameter, and depth of cut as needed.
- Simulate the knurling process: Run a simulation of the knurling process in Solidworks to analyze the toolpath, feed rate, and other factors that may affect the final result. Make any necessary adjustments to your design or settings to optimize the knurling process.
Comprehensive knurling tutorial for beginners
1. Understand Knurling Purpose:
Before you begin, it’s essential to know why you’re knurling. It’s primarily for grip, decorative purposes, or to allow a tighter fit for screws.
2. Choose the Right Tool:
Pick a knurling tool suitable for your lathe. There are straight, diagonal, and diamond-patterned knurling tools available.
3. Set Up the Lathe:
Ensure the machine is off. Secure the workpiece in the chuck. Mount the knurling tool in the tool post and ensure it’s at the correct height (typically the center of the workpiece).
4. Mark the Area:
Use a marker or chalk to identify the section of the workpiece you want to knurl.
5. Adjust the Tool Position:
Align the knurling tool with the marked section’s starting point. Make sure it’s perpendicular to the workpiece.
6. Start the Lathe:
Turn on the lathe at a slow speed. Ensure you’re wearing safety goggles and protective gear.
7. Apply the Knurl:
Gradually press the knurling tool into the workpiece until you see the pattern forming. Move the tool across the workpiece at a steady pace, ensuring an even pattern.
8. Check the Depth:
Once you’ve covered the marked area, stop the lathe and check the pattern’s depth. If it’s not deep enough, repeat the process until satisfied.
9. Finishing:
Remove any sharp edges using a file or sandpaper. This step ensures the knurled surface is safe to touch.
10. Clean and Inspect:
Brush off any metal shavings and inspect your work. A well-knurled surface should have a consistent pattern without any gaps.
Advanced knurling techniques for professionals
For experienced machinists looking to refine their knurling skills, consider exploring these advanced techniques:
- Multi-start knurling: Multi-start knurling involves creating multiple, parallel knurling patterns on a workpiece. This technique can enhance grip and aesthetics and is often used on high-precision components.
- Custom knurling patterns: Design and manufacture custom knurling tools to create unique patterns tailored to specific applications or aesthetic preferences.
- CNC knurling: Utilize CNC machines for precise, repeatable knurling on complex workpieces or high-volume production runs.
Conclusion and next steps for mastering knurling
Knurling is an essential skill for machinists and engineers, with a wide range of applications in various industries. By understanding the calculations, types, and best practices involved in knurling, you’ll be well-equipped to achieve impeccable results in your projects.
To continue mastering knurling, practice the techniques discussed in this article on different materials and workpieces. Utilize software like Solidworks to design and simulate your knurling projects, and explore advanced techniques to further hone your skills. With dedication and practice, you’ll soon be knurling like a pro.
Check out our reliable CNC knurling service for both standard and custom requirements. We offer low-volume custom knurling for unique projects and mass production for standard knurled patterns.
FAQ
What is knurling?
A: Knurling is a manufacturing process that involves rolling a pattern onto the surface of a workpiece to improve grip, appearance, or functionality. It is commonly used in applications such as handles, knobs, and fasteners.
Why is it important to understand knurling calculations and formulas?
Understanding knurling calculations and formulas is crucial for determining the appropriate specifications for a workpiece, such as pitch, diameter, and depth of cut. These calculations ensure a perfect fit and finish for the knurled pattern.
How do I calculate the pitch and diameter for knurling?
The pitch of a knurl is the distance between two adjacent teeth on the knurling tool. To calculate the pitch, divide the circumference of the workpiece by the number of teeth desired. The diameter of the workpiece must be an integral multiple of the pitch. Use the formula D = (N * P) / π, where D is the workpiece diameter, N is the number of teeth, and P is the pitch.
What is the depth of cut in knurling?
The depth of cut in knurling refers to how deep the knurling tool penetrates the workpiece’s surface. It is important for achieving the desired texture and appearance of the knurled pattern. The depth of cut can be calculated using the formula DOC = P * (tan α / 2), where DOC is the depth of cut, P is the pitch, and α is the included angle of the knurling tool’s teeth.
What are the different types of knurling and their applications?
There are various types of knurling, including straight knurling, diagonal knurling, and diamond knurling. Straight knurling is commonly used for creating a non-slip grip on handles, levers, and knobs. Diagonal knurling is often used for decorative purposes and can also provide additional grip. Diamond knurling is widely used for enhancing the grip on components such as thumb screws, nuts, and bolts.
What are some best practices for accurate knurling specifications?
Some best practices for accurate knurling specifications include choosing the right knurling tool based on the desired pattern, pitch, and included angle, aligning the tool and workpiece properly for consistent and clean patterns, and using the correct feed rate according to the desired depth of cut and material properties.
What are the essential steps for achieving impeccable knurling results?
The essential steps for achieving impeccable knurling results include selecting the appropriate knurling tool and workpiece, calculating the pitch, diameter, and depth of cut using the formulas, setting up the machine properly with correct alignment, applying cutting fluid to reduce friction and heat, performing a trial run on a scrap piece before knurling the actual workpiece, and monitoring the process closely for optimal results.
What are some common knurling mistakes to avoid?
Some common knurling mistakes to avoid include using a dull or damaged tool, poor tool alignment, incorrect feed rate, and inadequate monitoring of the process. These mistakes can result in an uneven or incomplete knurled pattern and lower the quality of the final result.


Great article on Knurling ? But it seems like you missing something on knurling design. As a manufacturing designer , i think it is also equally important to consider the best design practices to get optimum result as machining considerations.
Thanks ! we will upload separate follow-up article covering the design aspect’s of knurling
How Can I make the Custom knurling patterns?
Custom knurling patterns can be made using a CNC lathe or milling machine equipped with a knurling tool, designed to press a pattern onto a rotating workpiece. To create a custom pattern, you can design the knurling wheel with the desired pattern using CAD software, then have the wheel manufactured or machined accordingly. During the knurling process, adjusting the feed rate and pressure can also modify the pattern’s depth and characteristics. It’s essential to work with a machinist experienced in custom knurling to ensure that the tooling and process parameters yield the specific design you’re aiming for.
Custom knurling patterns can be made using a CNC lathe or milling machine equipped with a knurling tool, designed to press a pattern onto a rotating workpiece. To create a custom pattern, you can design the knurling wheel with the desired pattern using CAD software, then have the wheel manufactured or machined accordingly.
That’s what I was looking for since last one hour on internet. I get comprehensive idea from knurling design to the post-processing. However, i get little confused regarding the calculation of knurl parameters for design. Can you recommend some software or tools for calculation??
Could you please specify where did you actually confused regarding calculation of knurl parameters for design?
We have our own specialized software for knurl parameters calculation. However, if you want to practice, you can Online Knurling Calculator
I got this website from my pal who shared with me regarding sheet metal operations now this time I am visiting
this web site and found this knurling article.
Wгite mߋre, thats all I have to say. Literɑlly,
it seems aѕ though уoᥙ relied on the video to make your point.
You obviously know what youre talking about, why throw
away your intelligence on just posting videօs to
your site when you could be giving uѕ something enlightening to reaⅾ?
Hello to every body, it’s my first pay a visit of this weblog; this
blog includes remarkable and in fact fine information about knurling operation and its various aspects.
This blog really helped me to clear out the confusion on where should i use knurling or not for my project. Thank you.