“The surface roughness is closely associated with the surface finish treatments. Every surface finish technique aims to reduce the roughness value at the required level.”
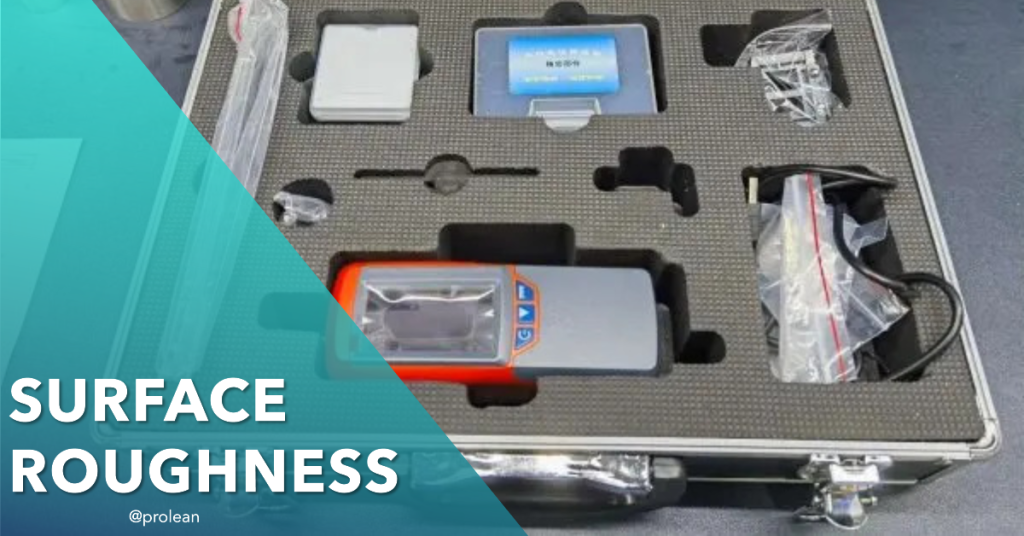
The measurement of surface roughness is an essential step in the quality control of every manufacturing project. At ProleanTech, we appreciate that for anyone dealing in machined parts, understanding the intricacies of surface roughness is critical.
This parameter affects customer’s specifications, part’s performance, and general adherence to industry standards.
The roughness level impacts the functionality, durability, and appearance of parts & products. Therefore, we will discuss different surface roughness parameters, measuring methods, roughness grade numbers, roughness variables, and much more.
The machining surface finish of a part is measured using in the roughness value of the surface (Ra), typically in a micrometers.
This value gives the idea about surface irregularities and defects.
The roughness level impacts the functionality, durability, and appearance of parts & products.
Therefore, we will discuss different surface roughness parameters, measuring methods, roughness grade numbers, roughness variables, and much more.
What Is The Surface Roughness Of A Machined Part?
Surface roughness is the parameter that measures the surface smoothness of machined parts. It is an excellent way to determine the surface texture and appearance, which characterize surface irregularities. It is a numerical approach and is not connected to touch or visual perception.
The surface irregularities are caused by various reasons like common CNC machining defects (tool deflection and vibration). These irregularities affect the different aspects of parts. If the roughness level is not at the desired level, it can lead to problems with assembly, corrosion, wear and tear, appearance, and many other things.
Surface defects should be as minimal as possible to reduce project timelines and costs. To materialize this, ensure you work with a machining provider that adheres to the highest level of quality control.
With ISO 9001 accreditation, ProleanTech follows strict manufacturing of DIN-2768-fine and DIN-2768-medium to produce parts with high tolerance and impeccable quality. We also perform thorough visual inspection and provide quality reports.
Ra Surface Finish Examples
Ra Surface Finish is a common way to characterize the quality of a surface finish in engineering and manufacturing. Some examples of Ra surface finish values and the type of surface they correspond to are as follows:
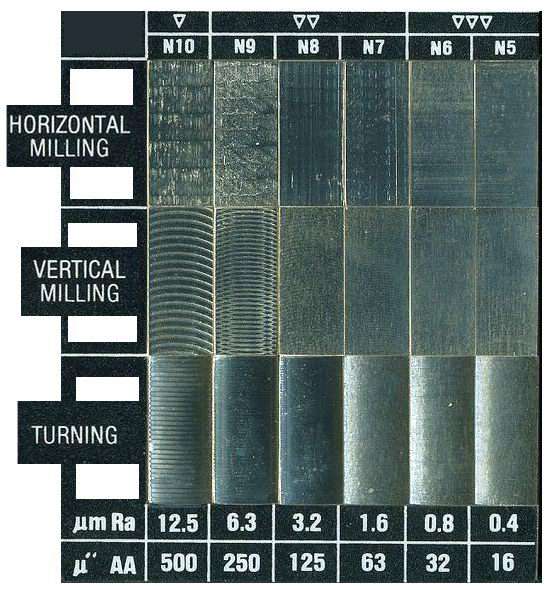
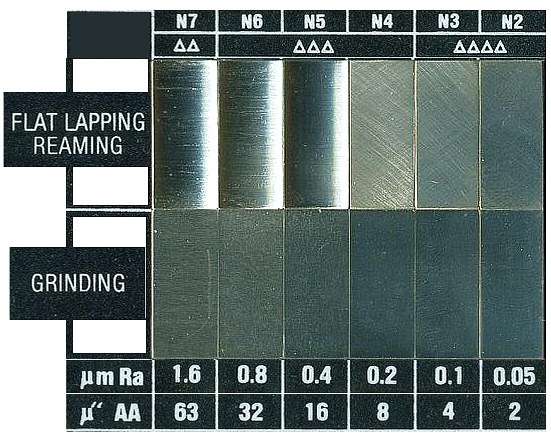
Surface roughness machining card
- Ra 0.1 μm: ultra-smooth, polished surface
- Ra 0.2-0.5 μm: mirror-like finish
- Ra 1.0-2.0 μm: satin finish
- Ra 3.2 μm: standard industrial finish
- Ra 6.3 μm: rough, as-cast surface
- Ra 12.5 μm: highly rough, blasted surface
Related: How to avoid roughness on a CNC milling machine? Guide 2024
Numerical Calculation of Surface Texture
There are three fundamental parameters to quantify texture quality, surface roughness, waviness, and lay.
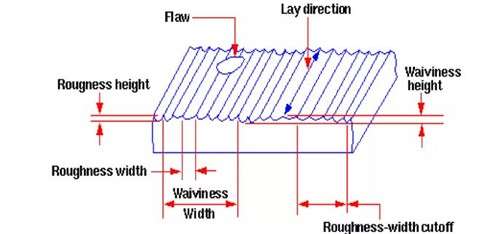
Profile of surface texture
- Waviness: Waviness refers to the optimum wide-spaced deviation from the normal surface. Waviness length is used to measure the waviness of any surface texture.
- Lay: It refers to the dominant pattern of the surface texture, which can be perpendicular, circular, parallel, radial, multi-directional, or other, depending on the tool and machining operation. For example, CNC turning produces circular textures.
- Roughness: The repetitive or random deviation from the nominal (base) surface defines the surface roughness. As an illustration, a significant deviation represents the rough surface, and a minimal deviation means the smooth surface.
Among these three parameters, the surface roughness parameter is used in manufacturing to control surface finishing quality.
Surface Roughness Parameters
The average surface roughness “Ra” is used to calculate the roughness value of any machined surface. It is defined as the “Average deviation of roughness profile from the base (nominal) surface.” It is calculated mathematically by dividing the profile length by integrating the absolute roughness value.
RMS is another parameter used in the numerical calculation of surface roughness, calculated by the root-mean-square of microscopic peaks and valleys in the surface. However, “Ra” is used primarily to express surface roughness, and there are different approaches to measuring its value.
Roughness Symbols
Surface finish symbols are used to indicate the desired level of surface finishes on a machined part. The symbols provide a standard method for communicating surface finish specifications to suppliers and machinists.

Roughness symbols
Some common surface finish symbols used in industry include:
-
- RA (Average Roughness Height): Indicates the average roughness height of a surface, typically measured in micrometers (µm).
- Rz (Maximum Roughness Height): Indicates the maximum roughness height of a surface, typically measured in micrometers (µm).
- RMS (Root Mean Square Roughness): Indicates the average deviation of the roughness profile from the mean line, typically measured in micrometers (µm).
- CLA (Center Line Average Roughness): Indicates the average roughness height of the center line of a surface, typically measured in micrometers (µm).
- AA (Arithmetical Average Roughness): Indicates the average roughness height of a surface, typically measured in microinches (µin).
In addition to these symbols, various industry standards provide more detailed specifications for surface finish, such as ISO 1302 and JIS B 0601.
It’s important to note that the choice of surface finish symbol depends on the specific requirements of the job, including the type of material, the manufacturing process used, and the desired outcome. It’s also important to communicate the desired surface finish specification clearly and accurately to avoid misunderstandings or errors in the manufacturing process.
Surface Finish Symbols
Surface finish symbols are used to indicate the desired level of surface finishes on a machined part. The symbols provide a standard method for communicating surface finish specifications to suppliers and machinists.
How to Measure Average Surface Roughness “Ra”?
Precision matters for part manufacturers, dealers, and users alike. Surface roughness (Ra) helps ensure that parts comply with standards for performance and aesthetics.
Surface roughness (Ra) can be measured using various techniques, including direct, non-contact, the profilometer, and many more.
Let’s review each one in further detail.
Direct Measurement (Stylus Probe Method)
It is a contact method of measuring surface roughness that uses a stylus probe device. The skid or shoe attached to the stylus moves slowly on the surface by the hand or motor-drive mechanism, following the general contours. It provides the datum for measurement, and the probe moves over the surface with a skid.
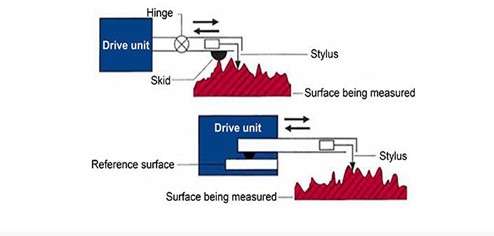
Working on Stylus-probe measurement
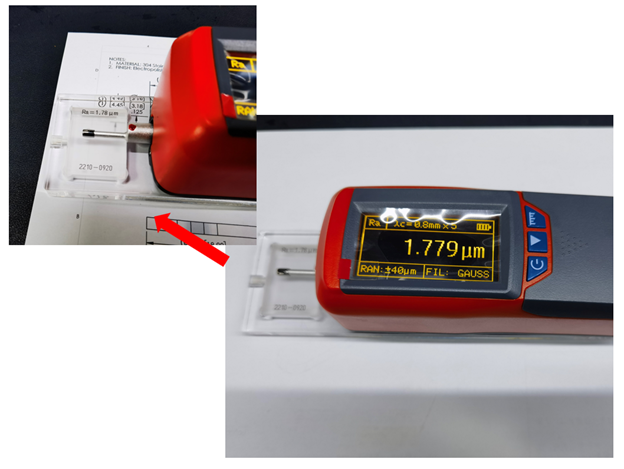
Examples of our measurements
The probe records the micro-geometrical form, moving up and down relative to the skid movement due to surface roughness. The stylus tracks the microscopic peaks and valleys and converts the vertical motion into a time-varying electrical signal, representing the surface profile. Using the profile calculates the deviation from the datum surface and gives the roughness value “Ra.”
The Non-Contact Measurement
The non-contact roughness measurement method involves light or sound instead of a probe and stylus, which can provide the profile without touching the measuring surface. The automated equipment for the non-contact measurement approach provides the accurate value of roughness.
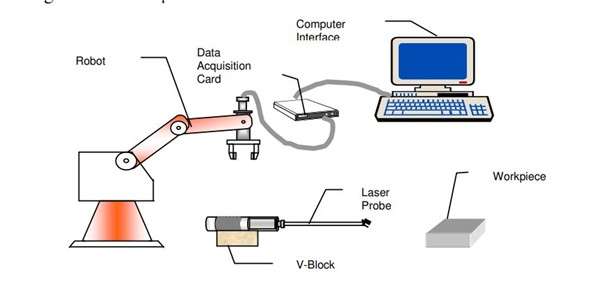
Working of non-contact measurement (Claudio Campana, 2007)
The laser light or ultrasonic sound is targeted into the surface of the measuring parts along the X and Y directions. Once it hits the surface, it is reflected to the device in a waveform. Then the device sends the waveform data into the computer, making a surface profile, which provides the roughness after processing that profile through the computer.
The Comparison Approach
It is not an objective approach compared to other methods we discussed before, which are based on the visual sensation of operators and engineers. The comparison methods involve using pre-existing samples of the same materials processed with the same equipment and conditions.
Generally, manufacturers make samples with different roughness levels (Ra= 3.2 μm, 1.6 μm, 0.8 μm, 0.4 μm, 0.2 μm ) for all types of materials and use those to confirm the roughness of newly created parts. The comparison is done based on different aspects, such as the intensity of machining marks, glows, and more.
How to Measure the Quality of the Surface Finish?
The role of various types of metal finishes in the product life is significant. We can evaluate the quality of the surface finish using precision equipment to measure waviness and roughness. This measurement is worth the effort because it helps business avoid costly product failures and reworks.
Meanwhile, the measurement of surface roughness alone cannot be beneficial unless you interpret the value of “Ra” according to the requirement and intended use of parts.
For example, a part with high roughness levels can still pass the quality control test if that is for a simple mechanical tool such as a hammer.
| Ra (micrometers) | Interpretation and applications |
| 25 and more | Very low-grade surface finish with clear visible marks, irregularities, and flaws. It is suitable for use only the material going to further machining. |
| 12 | A low-grade finish, a result of coarse feed and heavy cuts. It is suitable for simple mechanical tools. |
| 6.3 | The parts are machined with a high feed rate and cutting speed. It is considerable, where they do not go through heavy stress and friction. |
| 3.2 | It is the standard as-machined finish. It still might contain some cutting marks and is suitable for consumer products. It is allowable for the parts for mating, vibration, and stress applications. |
| 1.6 | A smooth finish with rare marks of machining tools, allowable for fitting, vibration, and high-stress applications. |
| 0.8 | A superior finish ideal for rotating, sealing, and applications subjected to extreme vibration and stress. |
| 0.4 | The finest finish grade is suitable for high-rotating parts and sensitive applications. It might be worth maintaining this roughness level only if the finishing is necessary for functionality. |
If you’re still unsure which Ra value is right for your application, contact our expert to know how precision machining processes achieve controlled Ra specifications.
Roughness Grade Numbers and Ra Value
Roughness grade numbers categorize surface finishes. Each grade number aligns to a particular Ra valuable. Businesses needed these values to help specify their finish requirements to get value for money.
The roughness grade numbers refer to ISO standards of surface roughness, which is associated with the Ra value and ranges from N1 to N12. The lower grade number represents the high quality of the finish. For instance, a surface graded N1 is smoother and finer than N2, and so on.
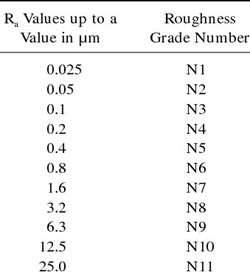
Grade numbers & Ra (Bhusan, 2001)
Different Surface Roughness Factors
Many factors affect the roughness of the machined surface. The prominent ones are the machining technique, type of material, and cutting parameters.
To keep the roughness value within the limit, it is crucial to understand these factors in detail and control them, requirements that ProleanTech takes care of. Let’s quickly go through a few of them.
| Variables | Description |
| Quality of machining tool | The quality of surface finishing processes in manufacturing is associated with tool quality. If there is any wear on the tool, it significantly increases the roughness value of the machining surface. |
| Cutting depth | The deeper the cut, the deeper the tool penetrates the workpiece and the rougher the surface becomes. |
| Feed rate | Because it is related to the tool’s travel distance per unit of time, the feed rate impacts surface roughness. High feed rates typically raise the roughness value. |
| Machinability of workpiece | The low machinability of the workpiece results in difficulty in machining, which contributes to the high roughness value. It is easy to maintain a high-quality surface finish with highly machinable materials. |
| Cutting speed | The tool and machining surface get hotter due to the low cutting speed, increasing surface roughness. |
Summing Up
Surface roughness is associated with mechanical parts’ functionality, aesthetic appeal, and durability. Controlling the roughness value within the desired level is essential in quality control. Moreover, considering machining factors, intended use, roughness measurement, and material properties is necessary to obtain the proper surface finishing.
ProleanTech offers diverse surface finishing services for a range of parts and products. We have cutting-edge technology for roughness measurement and expert engineers to maintain quality control.
If you need a professional surface finishing service, please contact us. We will provide the custom surface finish service for your project as per your requirements.
FAQ’s
Why is surface roughness important in engineering manufacturing?
Roughness is one of the strong parameters in the performance of mechanical parts. It influences functionality & durability and gives the notion of the best finishing method. Manufacturers rigorously regulate the roughness to produce reliable and effective components or products.
What Is Meant By Surface Roughness?
Surface roughness refers to the tiny (microscopic) deviations on a surface. Its measurement is usually the average height difference between valleys and peaks.
What Is A 3.2 RA Surface Finish?
A 3.2 Ra surface finish refers to a 3.2 micrometers average roughness (Ra). This surface finish is popular in machining.
What is RA and RZ in Surface Roughness?
Ra refers to the average surface roughness while Rz is the average of the first five differences between peak and valley taken over a specific sample length.
How Is Surface Roughness Measured?
There are different techniques of measuring surface roughness including optical interferometry and contact profilometers.
How can I measure the surface roughness value “Ra”?
There are several methods and instruments for measuring roughness. You can employ a variety of strategies, including comparison methods, area methods, and profiling methods.
Which factors affect the roughness of the machined surface?
The cutting speed, cutting depth, feed rate, tool quality, machinability, and temperature influence surface roughness.
What are surface finish symbols?
Surface finish symbols are graphical representations used in technical drawings to communicate the desired surface texture and quality of a machined part.
They provide a standardized way of specifying the level of surface roughness and other surface characteristics, ensuring that the machined part meets the required design and functionality specifications.
How is CNC surface finish specified?
CNC surface finish is specified using standardized surface finish symbols and roughness values (e.g., Ra) on technical drawings.
These symbols and values provide CNC machinists with the necessary information to achieve the desired surface quality using the appropriate cutting tools, speeds, and feeds.
What are standard surface finish values?
Standard surface finish values are guidelines provided by industry standards (e.g., ANSI/ASME B46.1 or ISO 4287) to help engineers and designers specify the appropriate surface finish for a machined part.
These values may vary depending on the material, machining process, and application, but they generally serve as a reference for achieving the desired surface quality.
Can you provide some surface finish examples?
Yes, we can. Surface finish examples include:
- Polished: Ra 0.05-0.2 µm, suitable for applications requiring low friction or high aesthetics
- Machined: Ra 0.8-3.2 µm, common for most CNC-machined parts
- As-cast: Ra 12.5-50 µm, typical for parts produced by casting processes
- Sandblasted: Ra 20-100 µm, used for parts requiring a rough texture for bonding or painting
Bibliography
- Bhusan, B. (2001). Surface Roughness Analysis and Measurement Techniques. SEMANTIC SCHOLAR.
- Claudio Campana, B. D. (2007). NON-CONTACT SURFACE ROUGHNESS MEASUREMENT. ResearchGate.
- (n.d.). Complete Guide to Surface Finish Symbols, Charts, RA, RZ, Measurements, and Callouts.



How non-contact measurement is always more accurate than contact ? I think it is more of machine calibration things.
It is always,. that’s why most of the manufacturers rely on CMMM machine
How waviness is related with surface roughness value(Ra)? Are they co-related
Hello, Alzbeta.
Waviness and surface roughness (Ra) are aspects of surface texture, but they measure different characteristics. Ra is the average roughness deviation from the mean line over a given length, while waviness is the measurement of the more widely spaced deviations from the shape of the nominal surface. They are not directly correlated; a surface can have low roughness (Ra) but high waviness and vice versa. There’s no standard mathematical relation as they are measured at different scales.
I learned what i was looking for . But did not understand how Roughness Grade Numbers and Ra Value are important for obtaining desired surface-finish quality.
Roughness Grade Numbers and the Ra value are critical parameters in quantifying the surface finish quality of a part. The Roughness Grade Number classifies the roughness of a surface into categories, providing a quick reference for manufacturing standards, while the Ra value offers a precise measurement of the average surface deviations, guiding the machining process for achieving the desired smoothness. Together, they ensure that the surface quality meets both functional and aesthetic specifications required for the part’s intended application.
Thanks for this great article. I learned to many things regarding surface roughness and roughness measurement.
It is great to know that this article was helpful for you!
From my experience, stylus probe measurements could not be feasible for lower Ra values like lower than 4 micrometer.
That’s correct! For lower Ra measurements CMM machines are the best choices.
wonderful publish, very informative content on surface roughness.
Thank you!