Any material processing implies the presence of various irregularities and inaccuracies in the future product after completion. Such inaccuracies in processing depend on several factors:
- Uneven chipping of the product when exposed to the cutter during cutting;
- Defective errors on the cutter itself (for example, as a result of natural wear);
- Failure of the contact between the workpiece and the tool due to the general system deformation of the machine, which is a consequence of the cutting force or an increase in temperature indicators.
The whole set of various inaccuracies, irregularities, protrusions, or depressions on the surface of the material characterize the overall roughness index.
The Importance of Surface Roughness Index in Mechanical Engineering
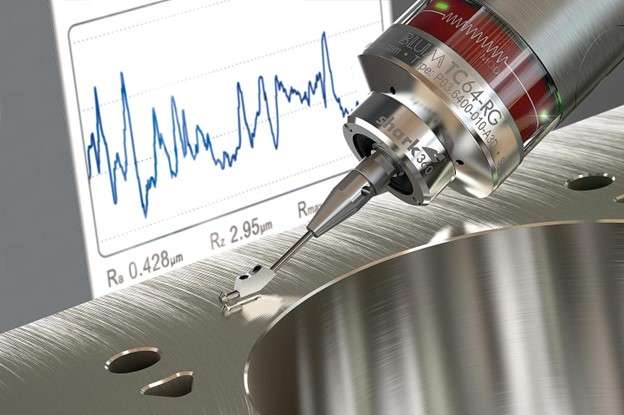
Measurement of the surface roughness
The measurement of the roughness index is carried out using the value “micrometer” (µm). Accordingly, the smaller this indicator is, the less rough the surface of the workpiece and the future product. It means a lower Ra value means more smoother surface finish.
This characteristic directly affects many important parameters of the product: its strength, corrosion, and chemical resistance, contact friction index, external aesthetics of the product, and so on.
The main, most important key elements in any mechanical machine are the so-called kinematic friction pairs. During their operation, that is, during the movement of pairs, a large energy fraction is spent on overcoming the friction force.
Accordingly, this energy is spent on heating, which in turn leads to useless energy dissipation, to mechanical losses. In addition, friction negatively affects the condition of the structural elements of the machine.
Why do we use lubrication methods?
The use of lubrication in such cases significantly improves the overall situation; however, the amount of lubricants needed is directly dependent on the overall roughness index. For example, when the bearings of the machine are heavily loaded, too little roughness has a negative effect on the oil – it is simply squeezed out of the zone where friction occurs.
This situation often leads to the process of “seizing” parts that touch each other, at the already molecular level. On the contrary, if a sufficient indicator of surface roughness is noted, the oil forms a reliable film protection, lingering in the depressions.
Many experimental studies have confirmed that the roughness index, which provides products with maximum durability, directly affects the specific conditions of detailed wear. Accordingly, the roughness characteristic is an important “attribute” of any machined part. This indicator must be indicated in the preliminary drawings.
Roughness During Milling
The roughness index is necessarily taken into account in the milling process: in order to reduce the friction force between the parts, the surface roughness value is reduced. This is achieved by special surface treatment of the product to increase the quality characteristics.
Do not confuse the concepts of the “quality” of the product and the roughness index. Sometimes it is thought that these are interdependent characteristics. However, quality is not only the surface state of the product; it is also its internal structure.
For example, when processing metal products, the surface temperature of the workpiece when exposed to cuts reaches from 800 to 1000 degrees. Accordingly, under such a temperature effect, the surface layer of the workpiece changes significantly, differing in its “quality” indicators from the internal structure of the material.
Such features must be taken into account when selecting a specific mode of milling. In addition, they are related to the roughness index that is expected to be achieved after processing the material.
Related:
The roughness index depends on many factors:
- On the type of workpiece by the material
- State and type of processing tool
- Milling mode and related conditions (processing speed, presence or absence of cooling systems, etc.);
- On the index of curvature of the cutter’s top teeth;
- Feed rate and milling depth.
From all this, the following fact follows: a decrease in the angles of cutter sharpening directly affects the reduction in the height of roughness. In addition, it is necessary to significantly reduce the amount of feed, as well as increase the radius of curvature of the toothed top.
Thus, the index of unevenness is determined by the dimensional characteristics of the cutter and its geometry.
However, other equally important factors also affect the degree of roughness. For example, different types of material blanks tend to form chips of different properties. Hard materials (mainly metals, such as cast iron) during processing form chips of a rather uneven structure with pointed edges.
Chipping of the Material
Accordingly, the chipping of the material occurs not only in the area where the cut passes but also touches adjacent layers. As a result, the expected value of roughness is not justified – it becomes much larger.
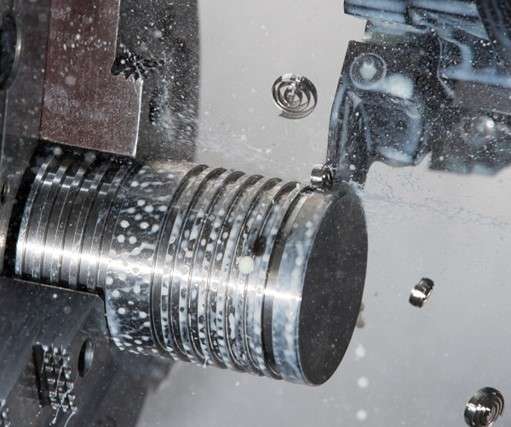
Chip Control in Machining
If we take the situation of low milling feed, then one of the decisive roles will be played by the state of the cutting tool. All defects and irregularities will be directly reflected on the material being processed, roughly speaking, “copying” on the workpiece.
Thus, when processing the material “cleanly”, it is necessary to clearly monitor the condition and quality of the cutting tool.
With any method of mechanical processing of materials, in particular, in contact with the cutter, micro-roughness appears on the surface of the workpieces in the form of depressions and protrusions, which are left behind by the cutting tool. Such deviations from absolute smoothness are called roughness.
In some cases, roughness occurs as a result of a single factor that causes an error (for example, table vibration), but in most situations, a number of reasons affect the occurrence of such errors: from the sharpness of the cutting tool to the stability of the table.
Knowing the main sources of roughness, it is possible, if not eliminated, and then at least minimize the likelihood of their occurrence.
The variety of factors affecting the surface quality after milling can be grouped as follows:
Causes of a Geometric Nature
The principle of milling consists of micro steps of the milling tool along the surface of the workpiece. In this case, after each step, a protruding part of the material remains forms the so-called residual comb.
The height and width of the protruding element depend on the feed rate and the shape of the cutting tool. The lower the feed rate, the lower the height of the irregularities will be.
In addition to this parameter, the degree of wear of the cutting tool affects the smoothness of the milled surface, which can also be attributed to geometric factors. The ground cutter moves along a distorted path, leaving protrusions and depressions in the workpiece.
Temperature and Plastic Deformations
Milling increases the surface temperature at the point of cut, which causes structural changes in the material, expressed in residual micro-roughness, uneven chips, and crumbling. This factor is reduced by the use of coolants and lubricants, which reduce chip formation and friction, thereby reducing the risk of roughness.
The occurrence of irregularities is also due to the elasticity of the material, which, after passing through the cutter, is partially restored, forming a scallop. The lower the cutting speed, the more noticeable residual plasticity artifacts will be on the surface of the workpiece.
The rigidity of the Machine and all its Components
In 80% of situations, surface roughness occurs as a result of insufficient rigidity of all or several elements of the frame chain – clamping tool – milling cutter – workpiece. This causes vibrations, beats, and other errors, leading ultimately to the appearance of irregularities. To avoid this, you must:
- install milling equipment on vibration mounts or massive foundations;
- check the strength and rigidity of the connection of all power elements and the clamping device;
- make sure that the cutting tool is firmly fixed, and long-end mills do not have axis distortion as a result of long-term use;
- Firmly fix the workpiece to eliminate micro-shifts during milling.
Role of Speed in Minimizing Surface Roughness
To minimize surface roughness, it is important to choose the right cutting speed and feed. These parameters should be set taking into account the characteristics of the material of the workpiece, the depth of processing, and the dimensions of the cutter.
Conclusion
Modern CNC milling machines allow you to process materials with high precision. In many situations, such aggregates make it possible to achieve the required roughness index already at the stage when the product is processed “cleanly”. Very often subsequent processing of the material in the form of polishing or grinding is not needed. At Proleantech, we can achieve the desired quality of surface with our finishing services. For further information, contact us, or request a finishing quote by uploading your design.
Read more:


0 Comments