When you bend a sheet metal part, its thickness enlarges or the dimensions take a different value. The final size will exceed the outer dimensions of the drawing unless bending is considered. While some would describe this as the material stretching, in reality, it experiences elongation. The intended elongation takes place because the neutral axis moves to the inner side of the metal.
The bend neutral axis is a position that remains unchanged during the bending process. The material located outside the neutral axis is subjected to tension and the inner side of the section is compressed. On this line of parity, there is no change—which means no elongation or condensation along the line. If the axis of neutrality shifts inwards, more material is displaced outward than is pushed inward, causing springback. This article is all about sheet metal bending calculation, formulas, and technical aspects. Moreover, it will cover general design tips for effective bending.
Sheet Metal Bending Calculation: Bend Allowance (BA)
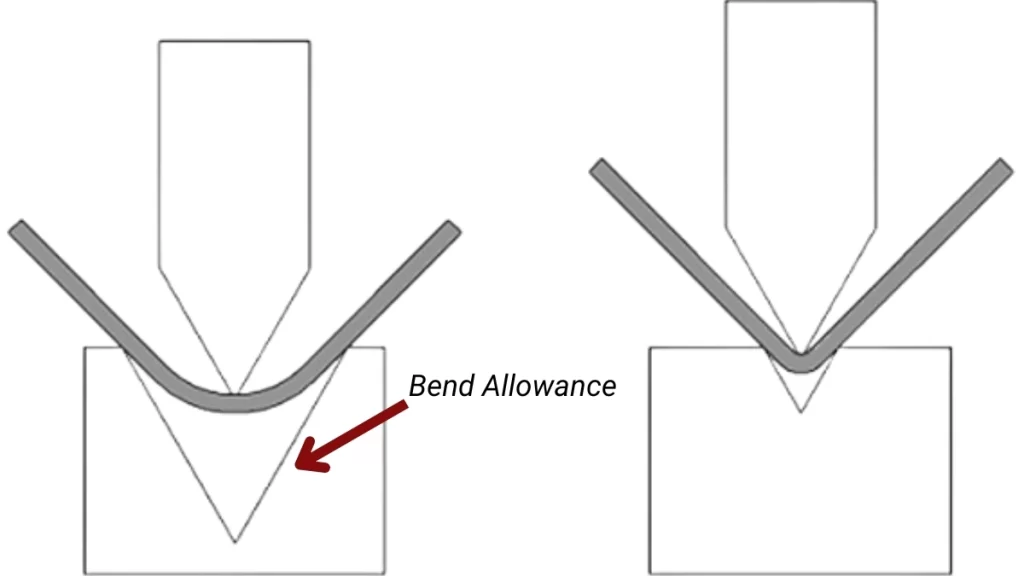
Bending allowance
In sheet metal bending calculation, bend allowance (BA) is an identical measurement factor. It provides an extra length required to develop the flat pattern of a part to account for the change in the material profile during bending. Calculation of the bend allowance to the right standard helps avoid common problems such as misalignment and poor fitment of the finished part.
Bend Allowance Formula
The typical formula used in a bend allowance calculator is:
BA=π/180×R×(A+B)
Where:
- BA = Bend Allowance (in inches or mm)
- R = Bend Radius (in inches or mm)
- A = Angle of Bend (in degrees)
- B = Material Thickness (in inches or mm)
Try Prolean Now!
Bend Deduction (BD) In Sheet Metal Bending Calculation
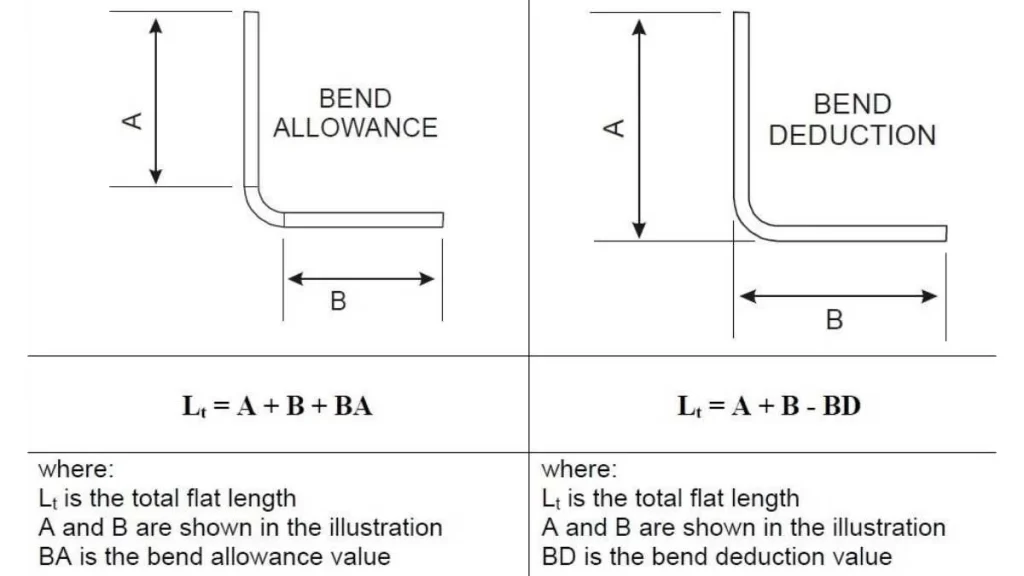
Bend allowance Vs. bend deduction
In addition to bend allowance, it’s also important to calculate bend deduction (BD), which accounts for the difference between the flat length of the material and the total length of the bent part.
The formula for Bend Deduction is:
BD=(A×B)+(BA×2)
Where:
- BD = Bend Deduction
- A = Angle of Bend
- B = Material Thickness
- BA = Bend Allowance
Bend Allowance Calculation Table
| Bend Radius (R) | Angle of Bend (A) | Material Thickness (B) | Bend Allowance (BA) |
| 0.25 inches | 30 degrees | 0.062 inches | 0.058 inches |
| 0.5 inches | 45 degrees | 0.125 inches | 0.174 inches |
| 0.75 inches | 60 degrees | 0.187 inches | 0.234 inches |
| 1.0 inch | 90 degrees | 0.25 inches | 0.364 inches |
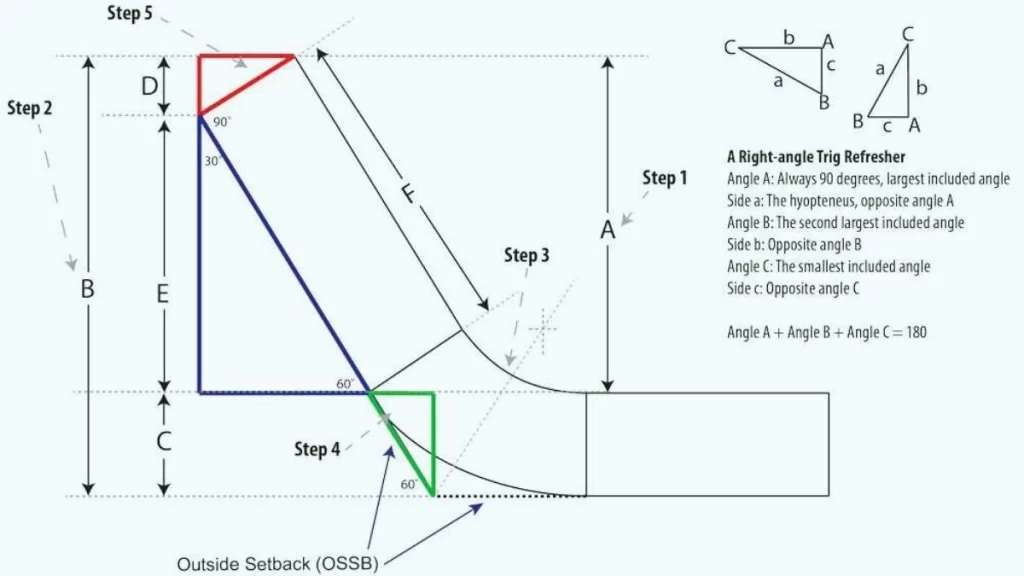
Bending Outside Setback (OSSB)
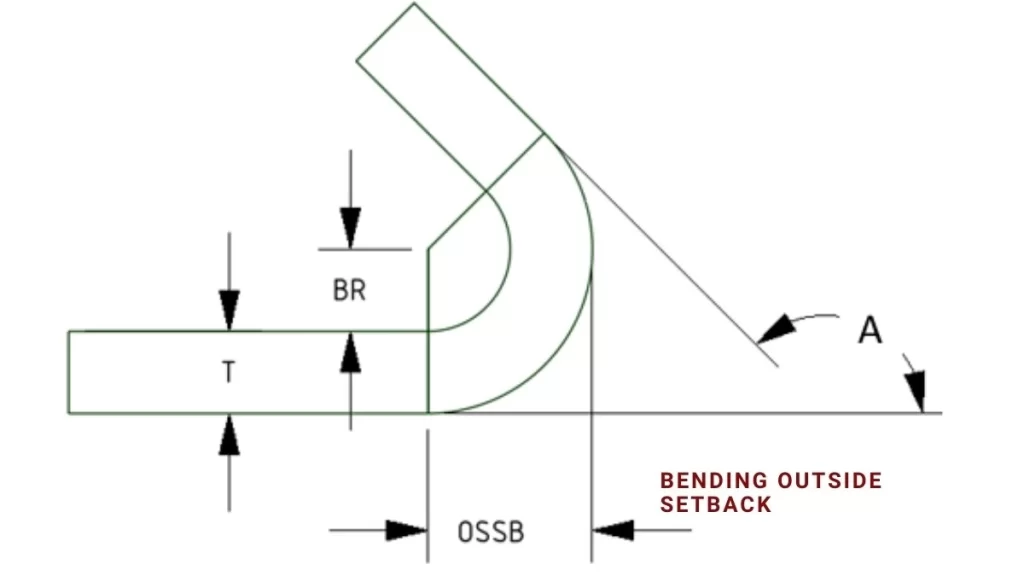
Bending outside setback (OSSB)
Outside Setback (OSSB) is a critical factor in sheet metal bending calculation. It determines the distance measured from the outer edge of the material to the bend axis. Measurements for Bending Outside Setback (OSSB) ensure the best part is the right size. In addition, calculations are essential to eliminate mistakes in the manufacturing process of a new product.
The process of calculating OSSB helps to reduce the amount of material used within construction projects. Moreover, it creates the possibility to improve flat layouts, which may lead to the optimization of material use.
Formula for Outside Setback
To calculate outside setback, use the formula below:
OSSB=R+T⋅ cos(A/2)
Where:
- OSSB = Outside Setback (in inches or mm)
- R = Bend Radius (in inches or mm)
- T = Material Thickness (in inches or mm)
- A = Bend Angle (in degrees)
Outside Setback Calculation Table
| Bend Radius (R) | Material Thickness (T) | Angle of Bend (A) | OSSB |
| 0.25 inches | 0.062 inches | 30 degrees | 0.265 inches |
| 0.5 inches | 0.125 inches | 45 degrees | 0.375 inches |
| 0.75 inches | 0.187 inches | 60 degrees | 0.485 inches |
| 1.0 inch | 0.25 inches | 90 degrees | 0.600 inches |
Development of Flat Blank Layouts
Two primary approaches are used for developing a flat-blank layout in sheet metal bending calculation. The chosen method is based on the dimensions you have available. In the first approach, a knowledge of leg dimensions is crucial. Each leg is a flat piece, with at least one side being an edge or bend of another leg or itself. In the second approach, measurements from the edges to the bend apex are needed. The bend apex is a point where two elements meet along parallel external planes.
- Flat blank = First leg dimension + Second leg dimension + Bend allowance
- Flat blank = Distance from top of inside bend to top of outside bend + Distance from top of inside bend to top of outside bend – Bend allowance.
The second method deals with bend deductions in a position manner. That can be either a plus or a minus. That is why, for OSSB, the bend deduction can be negative if the included angles are less than 90 degrees, such as in the example of 10 – (-5) = 15. The bend allowance calculators handle these signs automatically during calculations without needing further instructions. A negative deduction is important when calculating manually because you need to track sign changes. (Read more about bending stainless steel tubing)
K-Factor Calculation Sheet Metal Bending
k-factor calculation In bending
In sheet metal bending, The K-factor is a constant used to calculate the amount of material needed for bending. It stands for the distance between the neutral axis and the working thickness of the material, which describes how the material is stretched or squashed in the region of the bend line. Knowing about the K-factor enables the engineers to correctly evaluate the bend allowance as well as get the right part dimensions.
K-Factor Formula
In mathematical form, the K-factor is expressed as:
K-Factor=Distance from Neutral Axis/Material Thickness
Where,
- Neutral Axis: The area inside the material that experiences no compression or stretching during bending.
- Material Thickness: The overall thickness of the sheet metal being bent.
The value of the K-factor typically ranges between 0 and 0.5. For instance; A K-factor of 0.5 indicates the neutral axis is located halfway through the thickness. Lower values place the neutral axis closer to the inner bend, resulting in less stretching.
Table: Typical K-Factors for Materials
| Material | Typical K- Factor |
| Aluminum | 0.33 – 0.4 |
| Mild Steel | 0.35 – 0.4 |
| Stainless Steel | 0.4 – 0.5 |
| Copper | 0.35 – 0.45 |
The k-factor depends on the material type, thickness, bend radii, and the tool used. It’s essential to have accurate K-factor values for use in CAD software. These values help estimate the final part size. In addition, these values ensure consistency in the parts being produced.
Facts About K-Factors
- The K-factor indicates how much a metal material extends laterally during bending.
- It is measured as the distance of the neutral axis to the outermost fiber of the material divided by the material thickness.
- K-factor values are normally within the range of 0 and 0.5.
- A 0.5 K-factor means the neutral axis is in the middle or 50% of the way.
- Parts with low K-factors position their neutral axis closer to the inside of the bend.
- If the thickness of the material increases the K-factor decreases.
- Common K-factors: For bending aluminum (0.33–0.4), for bending stainless steel (0.35–0.4).
- CAD software uses K-factor values to estimate bend allowances.
- The K-factor enables the attainment of the right dimensions on bent parts.
Try Prolean Now!
Springback In Sheet Metal Bending Calculation
Springback In bending
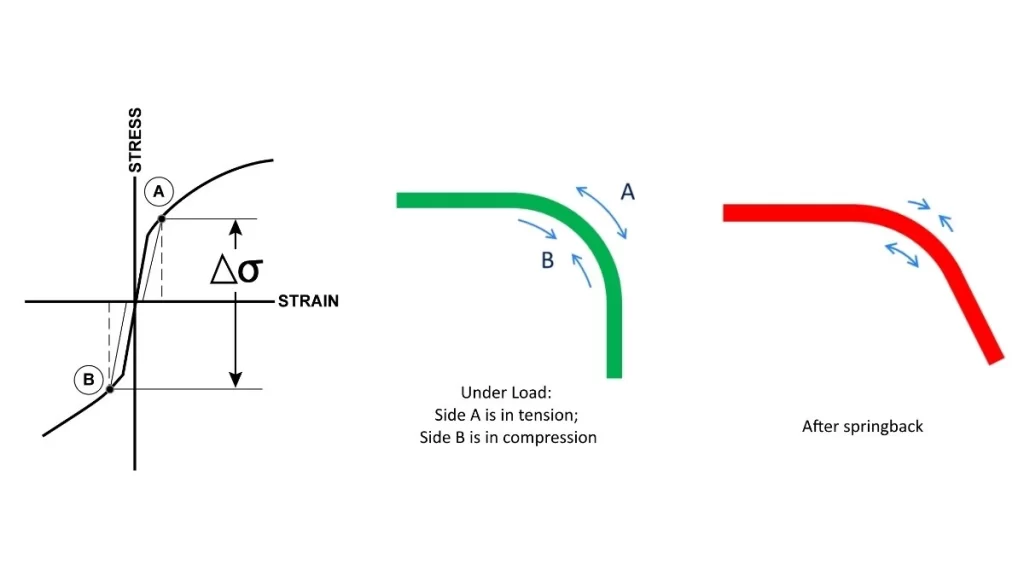
Springback dictates when sheet metal is bent, it regains slightly its original shape. The following reaction happens due to the material’s elastic properties. During bending, the material thins on the inside and thickens on the outside. In other words, it shortens in one direction and lengthens in the other.
In addition, the springback effect is developed when pressure is released to enable the metal to return to its original position. The degree of springback must be closely managed to achieve the final desired dimensions and calculations. You can achieve this by adjusting the bend angle to make a quadrilateral shape. Alternatively, you can apply more force to a specific bend.
Sheet Metal Bending Design Tips
Below are some simple but critical pointers you should consider when employing sheet metal bending techniques. These tips cover bending practices to avoid problems. Moreover, covers solutions for those issues.
Minimum Flange Length
Flange length In bending
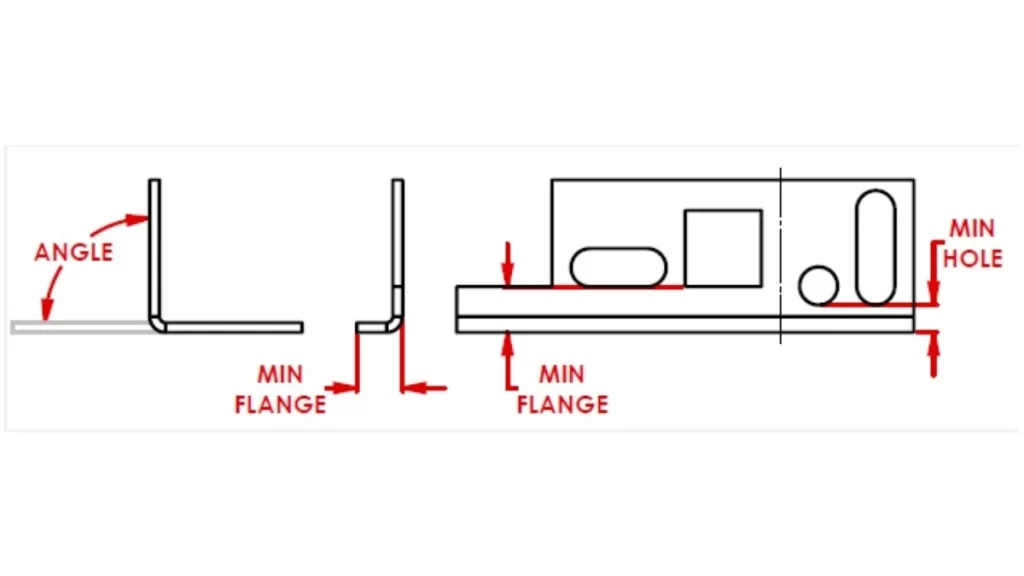
Every flange has a minimum length requirement based on thickness. Refer to the bend allowance chart for correct guidance in choosing the die width appropriately. Flanges shorter than defined standards should not be designed because they may not fit in place and can lead to poor bending quality.
Chamfered Edges
When designing the chamfered flanges, be sure to leave enough material near the chamfer to keep the bending angles intact. Do not extend chamfers up to the bend line to prevent deformation. Furthermore, minimum flange length results in accurate bends.
Hole Position Relative to Bend
Hole position In bending
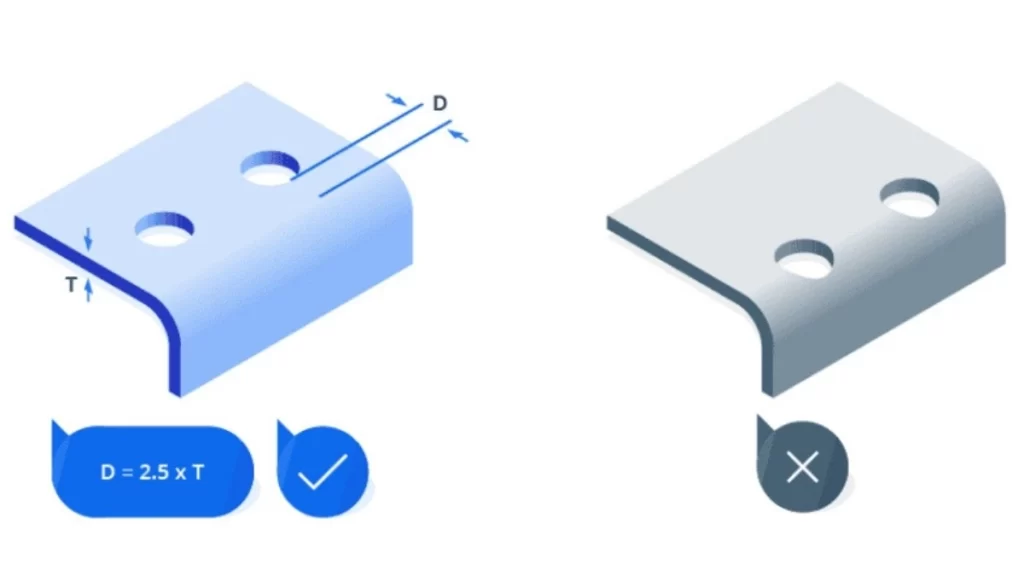
When the holes are placed close to the bend area, especially for noncircular holes, this might result in warping and misalignment of the bolt fittings. To avoid this, position holes beyond the minimum flange measurement indicated on the standard bending force chart.
Symmetry in Design
It is less of a challenge to design symmetrical parts. When possible try to design the symmetrical layout to minimize operator error and incorrect bends. However, Asymmetry can cause the operator to misjudge the bend direction. In cases where full symmetry cannot be achieved, be very keen to provide clear signals to direct the bending process to achieve the expected results.
Rivet Nut Positioning
Rivet nuts close to bend lines should be well positioned. It’s recommended that rivet nuts be installed before bending to prevent hole deformations.
Small Flanges on Large Parts
Small flanges on large components are difficult to produce. These setups should be avoided because handling is usually difficult and may involve lifting by hand and incur higher costs. Try to find alternate ways to reduce the complexity of the manufacturing process each time you can.
Consecutive Bends
When bends are sequential they need to be planned carefully. Always verify if your part will fit on the die afterward and at each progressive step during its creation. For forming U-bends, the middle part of the U-bend is made longer than the side flanges to facilitate correct die positioning, not marred by difficulties.
Align Bends Along One Line
The introduction of bends at a single line is cost-effective due to a reduction in the steps involved in production. Maintaining bends in line reduces the number of times that parts must be repositioned, which decreases the amount of time and money required. If the bends are isolated, each one must be corrected individually. This process can be time-consuming and costly.
Flattening Line Along an Edge
Make bending lines parallel to one side so that the parts can fit into position with ease. An adjacent side helps in the proper position of the machine. If there is no such alignment, then holding precision becomes a challenge, and can cause some disparities.
Bend Relief
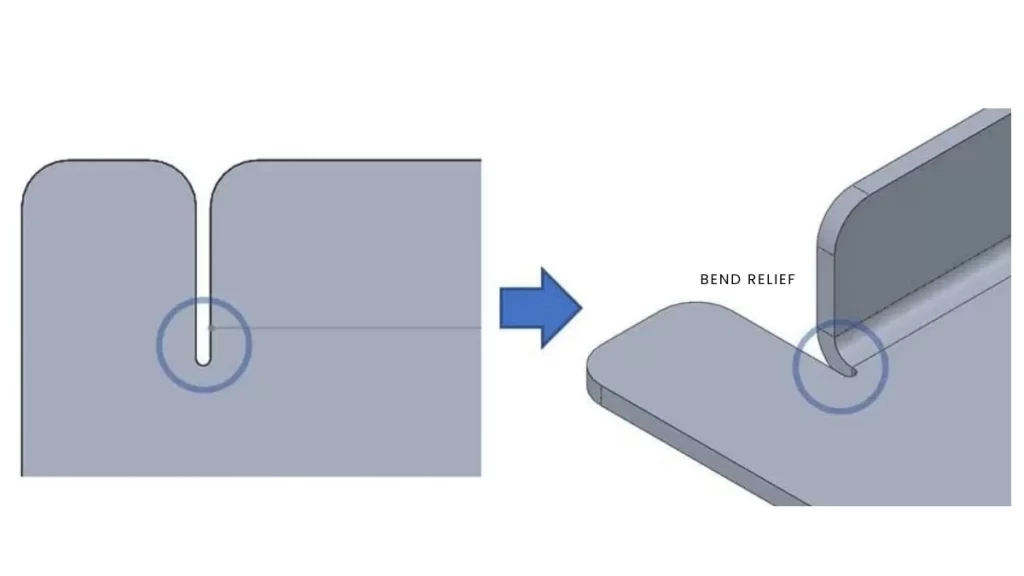
Bend relief
Bend reliefs should also be used for bending and to provide structural support where necessary. A slit or cutout in the edge of the flange prevents tears and stress fractures. It is advisable to design these cutouts slightly larger than the thickness of the material and give a small fillet to minimize stress on the material.
Bending a Box
Leave small gaps between box flanges to prevent interference. Without these gaps, final bends can interfere with previous bends hence causing structural failures. Small allowances enable the control of bends and maintain the form of the box.
Check the Flat Pattern
Use a flat pattern view in CAD frequently. Regular checks help prevent design flaws not seen in flat forms. Position it in a way to fit the piece tightly to avoid using excessive material and perhaps print several pieces of a model on a single sheet.
Minimum Bend Radius
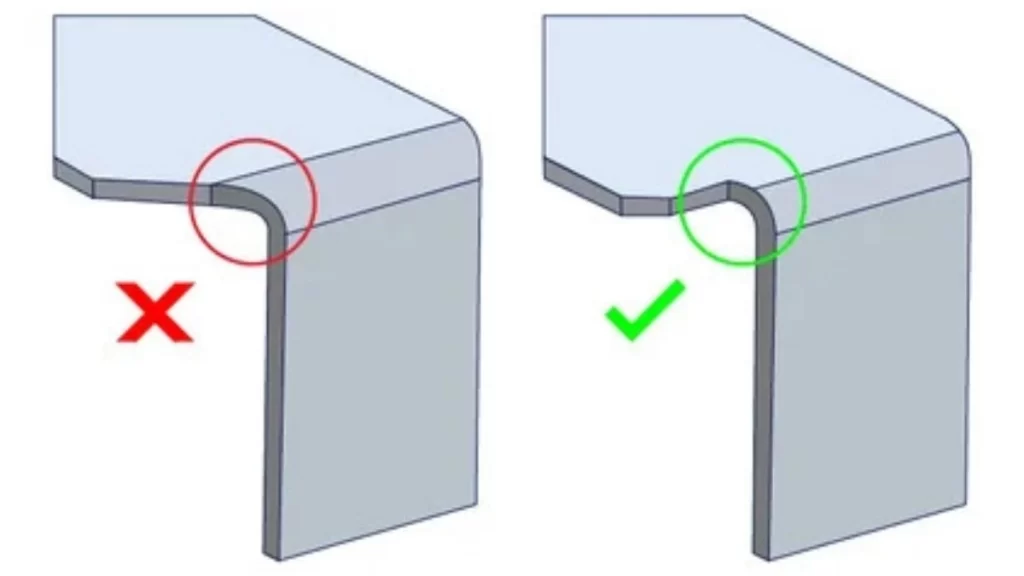
Bending radius guide
Select a bend radius not less than the thickness of the material being bent. This makes the bending process easy and minimizes the probability of developing incorrect bends. Although larger radii may entail more computation, a small radius may lead to material problems.
Orientation of Fiber Flow concerning Bending
Bends that lie in the plane of the rolled section are designated as alignment bends. They lie perpendicular to the grain of rolled materials. Aluminium and certain types of steel for example are known to crack if they are bent along the grain direction. By bending the material against the grain the resulting surfaces are stronger and more uniform.
Hemming Techniques
A hem is useful in strengthening edges but avoid creating an inside radius which should be small. To completely flatten the radius you need more pressure and can cause cracking. This risk is minimized when a precise, sheet metal bend radius calculator is used to ensure material consistency.
Material Selection
Most bends are achievable when the steel sheet thickness is standard up to 3mm for normal steel sheets. Thicker or specialty materials may have certain handling instructions to follow.
Try Prolean Now!
Metal Bending Online Services – Prolean Tech
Prolean’s online sheet metal bending service provides accuracy and quickness to all your needs. You can easily upload your designs, select materials, and set expectations using our online quoting system. Our precision machinery and experienced operators, guarantee that any metal part is bent to its optimal precision.
We use steel and aluminum, titanium among other materials to develop robust yet accurately formed parts. Our efficient structure results in fast quote generation and short delivery time, allowing you to save money and meet your deadlines.
Quality is our top priority. All pieces go through a rigorous examination to confirm they meet the required market standards. This assures that your components will work as intended.
Ready to explore the top metal bending solutions? Choose Prolean Tech for all your metal bending needs. To get a quote or to speak with our specialists, please feel free to contact us!

0 Comments